Canon BJC5100 User Manual - Page 87
Start, Settings, Printers, Delete., The last part of print job is not printing - bjc windows 7
 |
UPC - 750845724455
View all Canon BJC5100 manuals
Add to My Manuals
Save this manual to your list of manuals |
Page 87 highlights
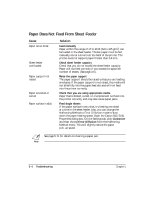
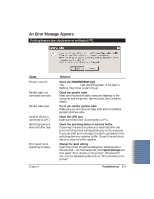
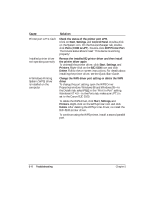
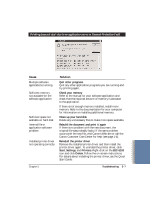
The last part of print job is not printing Cause Solution Paper used for printing differs from the paper size specified in the software application and printer driver Parallel cable not connected correctly Printer cable fault Specify the paper size you are using in the driver Paper Size setting If your software application allows you to specify the paper size in the page setup, ensure that the Paper Size settings in the software application and the printer driver are the same. Check the parallel cable Make sure the parallel cable is securely fastened to the computer and the printer. For details, see the Quick Start Guide. Try to use another printer cable Make sure you are using an IEEE 1284 ECP-compatible parallel interface cable. Switching device or external buffer fault Disconnect the switching device or external buffer Print with the printer directly connected to the computer. If you can then print normally, the fault is probably in the switching device or external buffer. Consult the switching device or external buffer supplier. Windows Printing System Change the WPS driver port setting or delete the WPS (WPS) driver is installed driver on the computer. You To change the port setting, open the WPS Driver Properties may not be able to print window. Windows 98 and Windows 95-In the Details tab, correctly with a WPS select FILE in the "Print to Port" setting. Windows NT printer driver installed 4.0-In the Ports tab, make sure LPT1 is set to the Canon on your computer. BJC-5100. To delete the WPS driver, click Start, Settings, and Printers. Right-click on the WPS printer icon and click Delete. After deleting the WPS printer driver, re-install the BJC-5100 printer driver. To continue using the WPS printer, install a second parallel port. Troubleshooting Chapter 5 Troubleshooting 5-9
-
 1
1 -
2
-
3
-
4
-
5
-
6
-
7
-
8
-
9
-
10
-
11
-
12
-
13
-
14
-
15
-
16
-
17
-
18
-
19
-
20
-
21
-
22
-
23
-
24
-
25
-
26
-
27
-
28
-
29
-
30
-
31
-
32
-
33
-
34
-
35
-
36
-
37
-
38
-
39
-
40
-
41
-
42
-
43
-
44
-
45
-
46
-
47
-
48
-
49
-
50
-
51
-
52
-
53
-
54
-
55
-
56
-
57
-
58
-
59
-
60
-
61
-
62
-
63
-
64
-
65
-
66
-
67
-
68
-
69
-
70
-
71
-
72
-
73
-
74
-
75
-
76
-
77
-
78
-
79
-
80
-
81
-
 82
82 -
 83
83 -
 84
84 -
 85
85 -
 86
86 -
 87
87 -
 88
88 -
 89
89 -
 90
90 -
 91
91 -
 92
92 -
93
-
94
-
95
-
96
-
97
-
98
-
99
-
100
-
101
-
102
-
103
-
104
-
105
-
106
-
107
-
108
-
109
-
110
 |
 |