Canon Canon EOS Rebel S Instruction Manual - Page 13
Attach, Remove, Lenses
 |
UPC - 805529880344
View all Canon Canon EOS Rebel S manuals
Add to My Manuals
Save this manual to your list of manuals |
Page 13 highlights
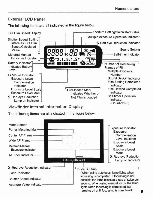
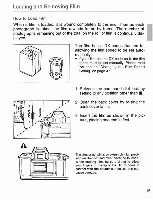
How to Attach and Remove Lenses Lens Attachment 0 I) 000-000 1. Remove the rear lens cap by turning it in the direction of the arrow. 2. Align the red marks on the lens and camera, and turn the lens in the direction of the arrow until it clicks. 3. Set the focus mode switch on the 3 4 lens to AF. • If the switch is set to M, the autofocus can not be used. • When using the autofocus, do not touch the rotating part of the lens. 4. Remove the front lens cap. Removing the Lens \ 0 eg.g.r.o.s..trn To remove the lens, turn the lens in the direction of the arrow on the lens while pressing the lens release button until it stops. 13
-
 1
1 -
2
-
3
-
4
-
5
-
6
-
7
-
 8
8 -
 9
9 -
 10
10 -
 11
11 -
 12
12 -
 13
13 -
 14
14 -
 15
15 -
 16
16 -
 17
17 -
 18
18 -
19
-
20
-
21
-
22
-
23
-
24
-
25
-
26
-
27
-
28
-
29
-
30
-
31
-
32
-
33
-
34
-
35
-
36
-
37
-
38
-
39
-
40
-
41
-
42
-
43
-
44
-
45
-
46
-
47
-
48
-
49
-
50
-
51
-
52
-
53
-
54
-
55
-
56
-
57
-
58
-
59
-
60
-
61
-
62
-
63
-
64
 |
 |

How
to
Attach
and
Remove
Lenses
Lens
Attachment
1.
Remove
the
rear
lens
cap
by
turning
it
in
the
direction
of
the
arrow.
0
I)
0000
-
000
3
4
Removing
the
Lens
0
eggrostrn
......
\
2.
Align
the
red
marks
on
the
lens
and
camera,
and
turn
the
lens
in
the
direction
of
the
arrow
until
it
clicks.
3.
Set
the
focus
mode
switch
on
the
lens
to
AF.
•
If
the
switch
is
set
to
M,
the
autofocus
can
not
be
used.
•
When
using
the
autofocus,
do
not
touch
the
rotating
part
of
the
lens.
4.
Remove
the
front
lens
cap.
To
remove
the
lens,
turn
the
lens
in
the
direction
of
the
arrow
on
the
lens
while
pressing
the
lens
release
button
until
it
stops.
13