Canon EOS 5D Mark II EOS 5D Mark II Instruction Manual - Page 48
Fully Automatic Shooting
 |
UPC - 013803105384
View all Canon EOS 5D Mark II manuals
Add to My Manuals
Save this manual to your list of manuals |
Page 48 highlights
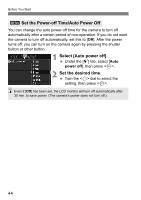
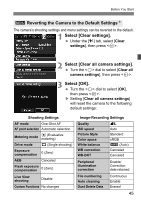
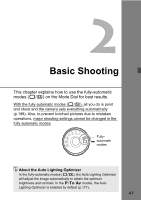
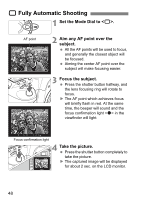
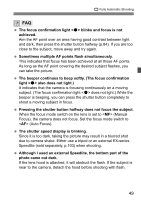
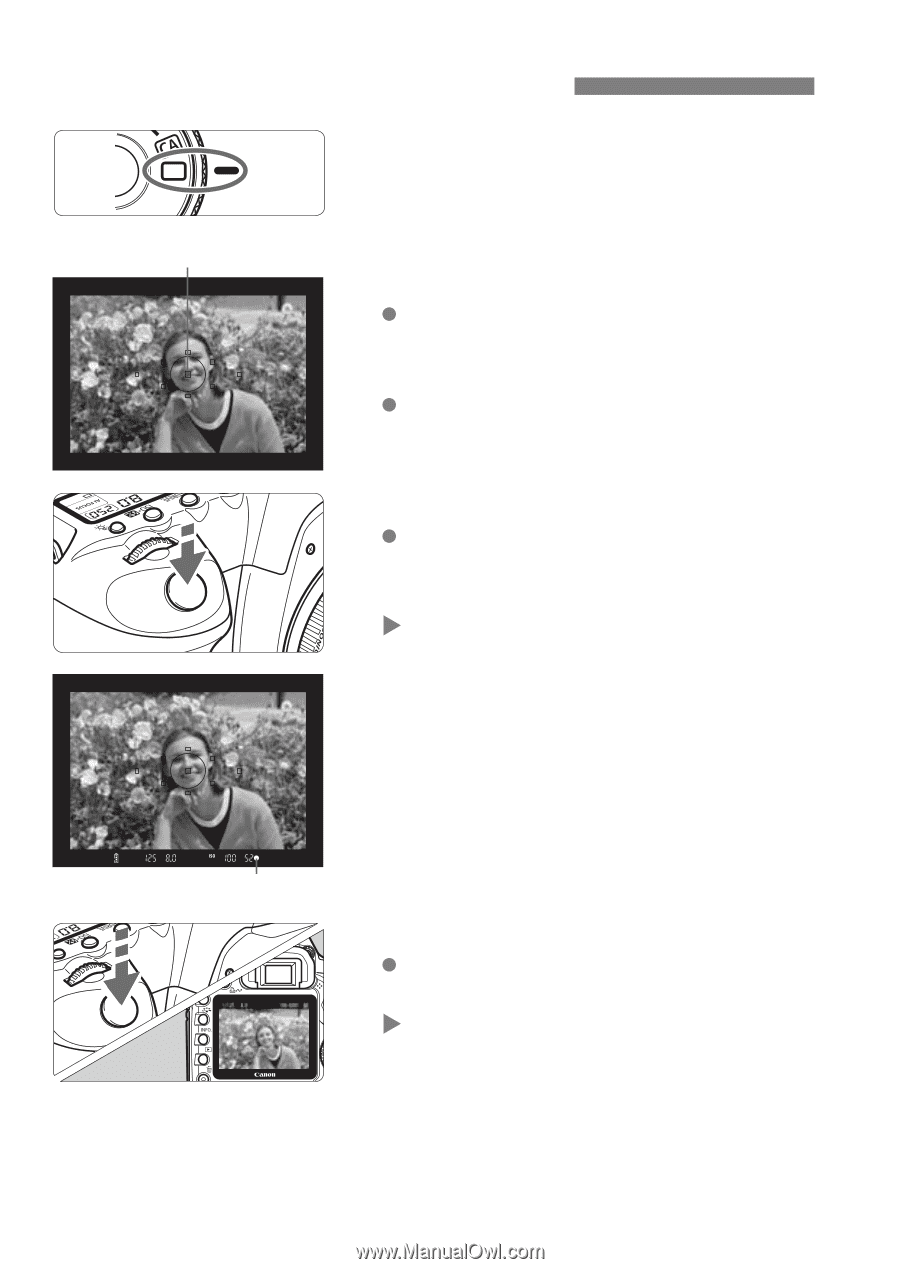
1 Fully Automatic Shooting 1 Set the Mode Dial to . AF point 2 Aim any AF point over the subject. All the AF points will be used to focus, and generally the closest object will be focused. Aiming the center AF point over the subject will make focusing easier. 3 Focus the subject. Press the shutter button halfway, and the lens focusing ring will rotate to focus. X The AF point which achieves focus will briefly flash in red. At the same time, the beeper will sound and the focus confirmation light in the viewfinder will light. Focus confirmation light 4 Take the picture. Press the shutter button completely to take the picture. X The captured image will be displayed for about 2 sec. on the LCD monitor. 48
-
 1
1 -
2
-
3
-
4
-
5
-
6
-
7
-
8
-
9
-
10
-
11
-
12
-
13
-
14
-
15
-
16
-
17
-
18
-
19
-
20
-
21
-
22
-
23
-
24
-
25
-
26
-
27
-
28
-
29
-
30
-
31
-
32
-
33
-
34
-
35
-
36
-
37
-
38
-
39
-
40
-
41
-
42
-
 43
43 -
 44
44 -
 45
45 -
 46
46 -
 47
47 -
 48
48 -
 49
49 -
 50
50 -
 51
51 -
 52
52 -
 53
53 -
54
-
55
-
56
-
57
-
58
-
59
-
60
-
61
-
62
-
63
-
64
-
65
-
66
-
67
-
68
-
69
-
70
-
71
-
72
-
73
-
74
-
75
-
76
-
77
-
78
-
79
-
80
-
81
-
82
-
83
-
84
-
85
-
86
-
87
-
88
-
89
-
90
-
91
-
92
-
93
-
94
-
95
-
96
-
97
-
98
-
99
-
100
-
101
-
102
-
103
-
104
-
105
-
106
-
107
-
108
-
109
-
110
-
111
-
112
-
113
-
114
-
115
-
116
-
117
-
118
-
119
-
120
-
121
-
122
-
123
-
124
-
125
-
126
-
127
-
128
-
129
-
130
-
131
-
132
-
133
-
134
-
135
-
136
-
137
-
138
-
139
-
140
-
141
-
142
-
143
-
144
-
145
-
146
-
147
-
148
-
149
-
150
-
151
-
152
-
153
-
154
-
155
-
156
-
157
-
158
-
159
-
160
-
161
-
162
-
163
-
164
-
165
-
166
-
167
-
168
-
169
-
170
-
171
-
172
-
173
-
174
-
175
-
176
-
177
-
178
-
179
-
180
-
181
-
182
-
183
-
184
-
185
-
186
-
187
-
188
-
189
-
190
-
191
-
192
-
193
-
194
-
195
-
196
-
197
-
198
-
199
-
200
-
201
-
202
-
203
-
204
-
205
-
206
-
207
-
208
-
209
-
210
-
211
-
212
-
213
-
214
-
215
-
216
-
217
-
218
-
219
-
220
-
221
-
222
-
223
-
224
-
225
-
226
-
227
-
228
 |
 |
48
1
Set the Mode Dial to <
1
>.
2
Aim any AF point over the
subject.
All the AF points will be used to focus,
and generally the closest object will
be focused.
Aiming the center AF point over the
subject will make focusing easier.
3
Focus the subject.
Press the shutter button halfway, and
the lens focusing ring will rotate to
focus.
The AF point which achieves focus
will briefly flash in red. At the same
time, the beeper will sound and the
focus confirmation light <
o
> in the
viewfinder will light.
4
Take the picture.
Press the shutter button completely to
take the picture.
The captured image will be displayed
for about 2 sec. on the LCD monitor.
1
Fully Automatic Shooting
AF point
Focus confirmation light