Canon EOS 5D Mark II EOS 5D Mark II Instruction Manual - Page 57
Setting the ISO Speed
 |
UPC - 013803105384
View all Canon EOS 5D Mark II manuals
Add to My Manuals
Save this manual to your list of manuals |
Page 57 highlights
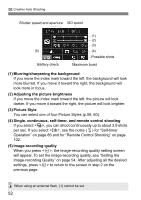
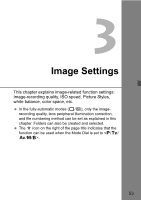
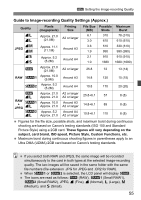
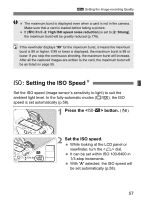
3 Setting the Image-recording Quality The maximum burst is displayed even when a card is not in the camera. Make sure that a card is loaded before taking a picture. If [8C.Fn II -2: High ISO speed noise reduction] is set to [2: Strong], the maximum burst will be greatly reduced (p.176). If the viewfinder displays "99" for the maximum burst, it means the maximum burst is 99 or higher. If 98 or lower is displayed, the maximum burst is 98 or lower. If you stop the continuous shooting, the maximum burst will increase. After all the captured images are written to the card, the maximum burst will be as listed on page 55. i: Setting the ISO SpeedN Set the ISO speed (image sensor's sensitivity to light) to suit the ambient light level. In the fully-automatic modes (1/C), the ISO speed is set automatically (p.58). 1 Press the button. (9) 2 Set the ISO speed. While looking at the LCD panel or viewfinder, turn the dial. It can be set within ISO 100-6400 in 1/3-stop increments. With "A" selected, the ISO speed will be set automatically (p.58). 57
-
 1
1 -
2
-
3
-
4
-
5
-
6
-
7
-
8
-
9
-
10
-
11
-
12
-
13
-
14
-
15
-
16
-
17
-
18
-
19
-
20
-
21
-
22
-
23
-
24
-
25
-
26
-
27
-
28
-
29
-
30
-
31
-
32
-
33
-
34
-
35
-
36
-
37
-
38
-
39
-
40
-
41
-
42
-
43
-
44
-
45
-
46
-
47
-
48
-
49
-
50
-
51
-
 52
52 -
 53
53 -
 54
54 -
 55
55 -
 56
56 -
 57
57 -
 58
58 -
 59
59 -
 60
60 -
 61
61 -
 62
62 -
63
-
64
-
65
-
66
-
67
-
68
-
69
-
70
-
71
-
72
-
73
-
74
-
75
-
76
-
77
-
78
-
79
-
80
-
81
-
82
-
83
-
84
-
85
-
86
-
87
-
88
-
89
-
90
-
91
-
92
-
93
-
94
-
95
-
96
-
97
-
98
-
99
-
100
-
101
-
102
-
103
-
104
-
105
-
106
-
107
-
108
-
109
-
110
-
111
-
112
-
113
-
114
-
115
-
116
-
117
-
118
-
119
-
120
-
121
-
122
-
123
-
124
-
125
-
126
-
127
-
128
-
129
-
130
-
131
-
132
-
133
-
134
-
135
-
136
-
137
-
138
-
139
-
140
-
141
-
142
-
143
-
144
-
145
-
146
-
147
-
148
-
149
-
150
-
151
-
152
-
153
-
154
-
155
-
156
-
157
-
158
-
159
-
160
-
161
-
162
-
163
-
164
-
165
-
166
-
167
-
168
-
169
-
170
-
171
-
172
-
173
-
174
-
175
-
176
-
177
-
178
-
179
-
180
-
181
-
182
-
183
-
184
-
185
-
186
-
187
-
188
-
189
-
190
-
191
-
192
-
193
-
194
-
195
-
196
-
197
-
198
-
199
-
200
-
201
-
202
-
203
-
204
-
205
-
206
-
207
-
208
-
209
-
210
-
211
-
212
-
213
-
214
-
215
-
216
-
217
-
218
-
219
-
220
-
221
-
222
-
223
-
224
-
225
-
226
-
227
-
228
 |
 |