Canon FAXPHONE L120 FAXPHONE L120 Software Guide - Page 65
Using the Shared Printer on Your Network, Open the [Add Printer Wizard] dialog box. - download
 |
View all Canon FAXPHONE L120 manuals
Add to My Manuals
Save this manual to your list of manuals |
Page 65 highlights
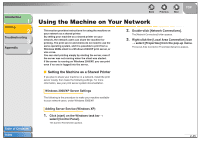
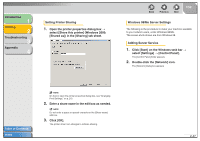
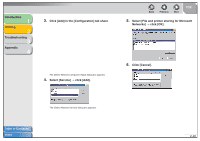
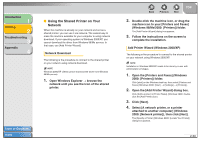
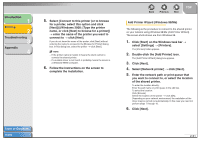
Introduction 1 Printing 2 Troubleshooting 3 Appendix 4 ■ Using the Shared Printer on Your Network When the machine is already on your network and set as a shared printer, you can use it via network. The easiest way to make the machine available for your computer is using network download. If your operating system is Windows 2000/XP, you cannot download the driver from Windows 98/Me servers. In that case, use [Add Printer Wizard]. Network Download The following is the procedure to connect to the shared printer on your network using network download. NOTE Windows 2000/XP clients cannot download the driver from Windows 98/Me servers. 1. Open Windows Explorer → browse the network until you see the icon of the shared printer. Table of Contents Index Back Previous Next TOP 2. Double-click the machine icon, or drag the machine icon to your [Printers and Faxes] (Windows 98/Me/2000: [Printers]) folder. The [Add Printer Wizard] dialog box appears. 3. Follow the instructions on the screen to complete the installation. Add Printer Wizard (Windows 2000/XP) The following is the procedure to connect to the shared printer on your network using Windows 2000/XP. NOTE Installation in Windows 2000/XP needs to be done by a user with administrator privileges. 1. Open the [Printers and Faxes] (Windows 2000: [Printers]) folder. Click [start] on the Windows task bar, then select [Printers and Faxes] (Windows 2000: [Start] → [Settings] → [Printers]). 2. Open the [Add Printer Wizard] dialog box. Click [Add a printer] in [Printer Tasks] (Windows 2000: doubleclick the [Add Printer] icon). 3. Click [Next]. 4. Select [A network printer, or a printer attached to another computer] (Windows 2000: [Network printer]), then click [Next]. The [Specify a Printer] (Windows 2000: [Locate Your Printer]) dialog box appears. 2-50
-
 1
1 -
2
-
3
-
4
-
5
-
6
-
7
-
8
-
9
-
10
-
11
-
12
-
13
-
14
-
15
-
16
-
17
-
18
-
19
-
20
-
21
-
22
-
23
-
24
-
25
-
26
-
27
-
28
-
29
-
30
-
31
-
32
-
33
-
34
-
35
-
36
-
37
-
38
-
39
-
40
-
41
-
42
-
43
-
44
-
45
-
46
-
47
-
48
-
49
-
50
-
51
-
52
-
53
-
54
-
55
-
56
-
57
-
58
-
59
-
 60
60 -
 61
61 -
 62
62 -
 63
63 -
 64
64 -
 65
65 -
 66
66 -
 67
67 -
 68
68 -
 69
69 -
 70
70 -
71
-
72
-
73
-
74
-
75
-
76
-
77
-
78
-
79
-
80
-
81
-
82
-
83
-
84
-
85
 |
 |
