Canon HV30E Instruction Manual - Page 24
Basic Functions, Recording, Recording Movies - review
 |
View all Canon HV30E manuals
Add to My Manuals
Save this manual to your list of manuals |
Page 24 highlights
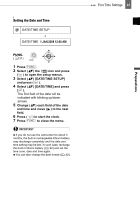
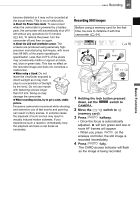
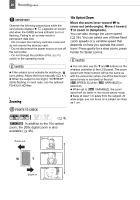
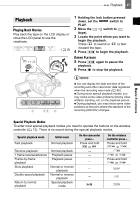
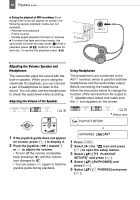
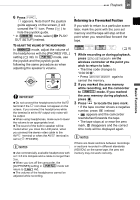
24 Recording Basic Functions Recording Recording TO REVIEW THE LAST SCENE RECORDED Recording Movies Before You Begin Recording Make a test recording first to check if the camcorder operates correctly. If necessary, clean the video heads ( 93). ( 8) 1 Holding the lock button pressed down, set the switch to CAMERA. 2 Move the / switch to (tape). If necessary, you can change the recording standard (HDV or DV) ( 36). 3 Press START/STOP to begin recording. Press START/STOP again to pause the recording. 1 Set the mode switch to . 2 If the joystick guide does not appear on screen, press ( ) to display it. 3 Push the joystick ( ) toward . • If does not appear on the joystick guide, repeatedly push the joystick ( ) toward [NEXT] to display the joystick guide in the illustration above. • The camcorder will play back a few seconds of the last recording made and return to record pause mode. If the currently selected recording standard is different from that of the last recording, the picture may not be played back correctly. WHEN YOU HAVE FINISHED RECORDING 1 Close the LCD panel. 2 Turn off the camcorder. 3 Remove the tape. 4 Disconnect the power source and remove the battery pack. NOTES Previous recordings overwritten by a new recording cannot be recovered. Before you start recording, search for the end of the last recording ( 30). To protect the tape and video heads, the camcorder will enter the stop mode ( ) if left in record pause ( ) mode for 4 minutes 30 seconds. To resume recording press START/STOP . When recording in very loud places (such as fireworks shows or concerts), sound may
-
 1
1 -
2
-
3
-
4
-
5
-
6
-
7
-
8
-
9
-
10
-
11
-
12
-
13
-
14
-
15
-
16
-
17
-
18
-
 19
19 -
 20
20 -
 21
21 -
 22
22 -
 23
23 -
 24
24 -
 25
25 -
 26
26 -
 27
27 -
 28
28 -
 29
29 -
30
-
31
-
32
-
33
-
34
-
35
-
36
-
37
-
38
-
39
-
40
-
41
-
42
-
43
-
44
-
45
-
46
-
47
-
48
-
49
-
50
-
51
-
52
-
53
-
54
-
55
-
56
-
57
-
58
-
59
-
60
-
61
-
62
-
63
-
64
-
65
-
66
-
67
-
68
-
69
-
70
-
71
-
72
-
73
-
74
-
75
-
76
-
77
-
78
-
79
-
80
-
81
-
82
-
83
-
84
-
85
-
86
-
87
-
88
-
89
-
90
-
91
-
92
-
93
-
94
-
95
-
96
-
97
-
98
-
99
-
100
-
101
-
102
-
103
-
104
 |
 |