Canon HV30E Instruction Manual - Page 80
change and press, the desired setting
 |
View all Canon HV30E manuals
Add to My Manuals
Save this manual to your list of manuals |
Page 80 highlights
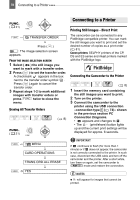
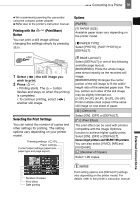
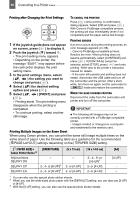
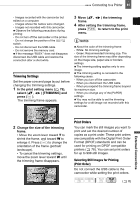
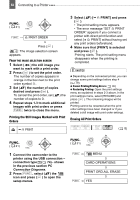
80 Connecting to a Printer Printing after Changing the Print Settings TO CANCEL THE PRINTING Press ( ) while printing. A confirmation dialog appears. Select [OK] and press ( ). With Canon's PictBridge compatible printers, the printing will stop immediately (even if not completed) and the paper will be fed through. 1 If the joystick guide does not appear on screen, press ( ) to display it. 2 Push the joystick ( ) toward . • The print setting menu appears. • Depending on the printer, the message "BUSY." may appear before the camcorder displays the print setting menu. 3 In the print settings menu, select ( , ) the setting you want to change and press ( ). 4 Select ( ) the desired setting option and press ( ). 5 Select ( , ) [PRINT] and press ( ). • Printing starts. The print setting menu PRINTING ERRORS If an error occurs during the printing process, an error message appears ( 88). - Canon's PictBridge compatible printers: Resolve the error. When printing does not resume automatically, select [CONTINUE] and press ( ). If [CONTINUE] cannot be selected, select [STOP], press ( ) and retry printing. Refer also to the printer's instruction manual for details. - If the error still persists and printing does not restart, disconnect the USB cable and turn off the camcorder and the printer. After a short while, turn them on again, set the camcorder to mode and restore the connection. WHEN YOU HAVE FINISHED PRINTING Disconnect the cable from the camcorder and printer and turn off the camcorder. disappears when the printing is completed. IMPORTANT • To continue printing, select another still image. The following still images may not be correctly printed with a PictBridge compatible printer. - Images created or changed on a computer and transferred to the memory card. Printing Multiple Images on the Same Sheet When using Canon printers, you can print the same still image multiple times on the same sheet of paper. Use the following table as a guideline for the recommended [ PAGE LAYOUT] settings depending on the [ PAPER SIZE] setting. [ PAPER SIZE] Canon Printer Series Inkjet printers SELPHY DS SELPHY CP SELPHY ES [CREDITCARD] [9 x 13 cm] - - 2-, 4- or [8-UP]2 2-, 4- or [8-UP]3 2- or [4-UP] 2- or [4-UP] [10 x 14.8 cm] 2-, 4-, 9- or [16-UP]1 2- or [4-UP] 2- or [4-UP] [A4] [4-UP] - - 1 You can also use the special photo sticker sheets. 2 When you use the wide-sized photo paper with the [DEFAULT] setting, you can also use [2-UP] or [4-UP]. 3 With the [8-UP] setting, you can also use the special photo sticker sheets.
-
 1
1 -
2
-
3
-
4
-
5
-
6
-
7
-
8
-
9
-
10
-
11
-
12
-
13
-
14
-
15
-
16
-
17
-
18
-
19
-
20
-
21
-
22
-
23
-
24
-
25
-
26
-
27
-
28
-
29
-
30
-
31
-
32
-
33
-
34
-
35
-
36
-
37
-
38
-
39
-
40
-
41
-
42
-
43
-
44
-
45
-
46
-
47
-
48
-
49
-
50
-
51
-
52
-
53
-
54
-
55
-
56
-
57
-
58
-
59
-
60
-
61
-
62
-
63
-
64
-
65
-
66
-
67
-
68
-
69
-
70
-
71
-
72
-
73
-
74
-
 75
75 -
 76
76 -
 77
77 -
 78
78 -
 79
79 -
 80
80 -
 81
81 -
 82
82 -
 83
83 -
 84
84 -
 85
85 -
86
-
87
-
88
-
89
-
90
-
91
-
92
-
93
-
94
-
95
-
96
-
97
-
98
-
99
-
100
-
101
-
102
-
103
-
104
 |
 |
