Canon MP970 MP970 series Quick Start Guide - Page 100
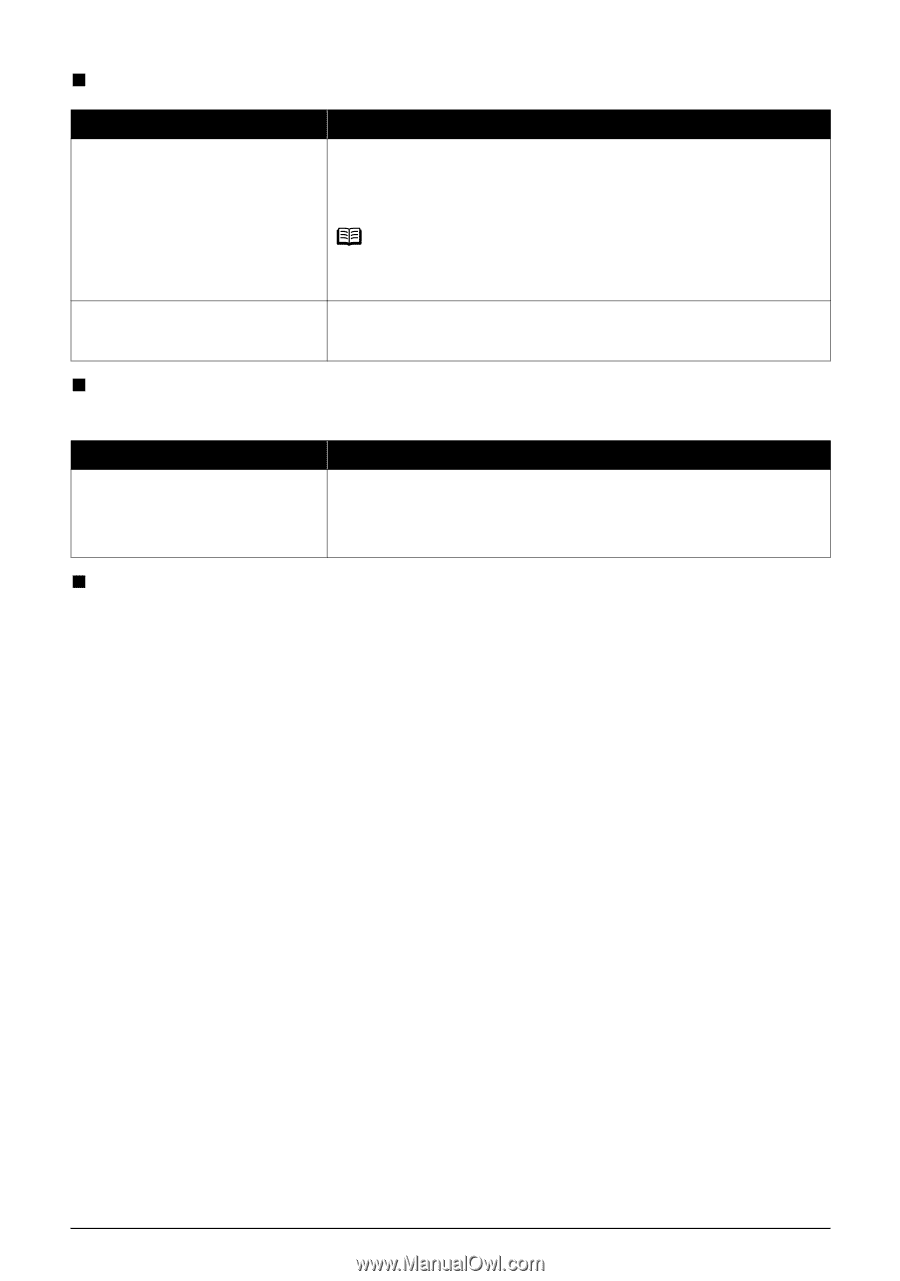
Frames Are Not Detected Correctly
 |
UPC - 013803081183
View all Canon MP970 manuals
Add to My Manuals
Save this manual to your list of manuals |
Page 100 highlights
„ Frames Are Not Detected Correctly Cause Film is out of position. Action Reposition the film in the Film Strip Frame on the Film Guide so that the separation lines between frames are aligned with the white line marks of the Film Holder. For loading the film, see "Scanning a Film" on page 35. The frame of a film is scanned on the edge of an image. / The edge of an image is missing. Note Repositioning the film may not resolve the problem, depending on the film. In this case, scan from the computer. For details, refer to the Scanning Guide onscreen manual. Adjust Film print cutting range and rescan. Refer to "Print Settings" in "Changing the Machine Settings" of the User's Guide on-screen manual. „ Color of the Print Result Is Different from the Original Film (Too Red or Too Blue) Cause Action The color balance of the film is off, depending on the shooting conditions or objects. You may not obtain satisfied print results for some films, even if you adjust the color setting in the advanced print settings of the film print mode. In this case, scan the film on the machine and save it to the computer. Then adjust the color of the scanned image on the computer using an image manipulation program and print it. For details, refer to the Scanning Guide on-screen manual. „ Other Scanning Troubles Refer to the Scanning Guide on-screen manual. 96 Troubleshooting
-
 1
1 -
2
-
3
-
4
-
5
-
6
-
7
-
8
-
9
-
10
-
11
-
12
-
13
-
14
-
15
-
16
-
17
-
18
-
19
-
20
-
21
-
22
-
23
-
24
-
25
-
26
-
27
-
28
-
29
-
30
-
31
-
32
-
33
-
34
-
35
-
36
-
37
-
38
-
39
-
40
-
41
-
42
-
43
-
44
-
45
-
46
-
47
-
48
-
49
-
50
-
51
-
52
-
53
-
54
-
55
-
56
-
57
-
58
-
59
-
60
-
61
-
62
-
63
-
64
-
65
-
66
-
67
-
68
-
69
-
70
-
71
-
72
-
73
-
74
-
75
-
76
-
77
-
78
-
79
-
80
-
81
-
82
-
83
-
84
-
85
-
86
-
87
-
88
-
89
-
90
-
91
-
92
-
93
-
94
-
 95
95 -
 96
96 -
 97
97 -
 98
98 -
 99
99 -
 100
100 -
 101
101 -
 102
102 -
 103
103 -
 104
104 -
 105
105 -
106
-
107
-
108
-
109
-
110
-
111
-
112
-
113
-
114
-
115
-
116
-
117
-
118
-
119
-
120
 |
 |