Canon N2000 User Guide - Page 14
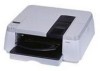
Printer Part Names, Front View, Back upper cover, Operation panel, Right cover, Manual feed lever
 |
View all Canon N2000 manuals
Add to My Manuals
Save this manual to your list of manuals |
Page 14 highlights
Printer Part Names „ Front View a b c d e f g h j i a Back upper cover Remove to install the printhead or to remove jammed paper. (ÆP.5-10, P.6-15) b Operation panel Provides Power button, Online button, Ink Replace button, LCD display, and other important buttons used to operate the printer. For details, see Chapter 4 "Using the Operation Panel Buttons". (ÆP.4-4) c Front upper cover Remove to set paper in the tray or to remove jammed paper. (ÆP.2-15, P.6-15) d Right cover Open to replace ink tanks. This cover is normally locked. To unlock this cover for removal in order to replace ink tanks, press the Ink Replace button on the operation panel. e Manual feed lever Releases the paper feed roller to allow manual paper feed. Raise this lever to feed paper manually for printing or to remove jammed paper. (ÆP.2-15, P.6-15) f Slide lever Slide to the left or right to fit the size of the paper for manual feeding. (ÆP.2-15) g Tray Set paper here for manual feed printing. Also functions as the paper exit 1-2 Before Using the Printer
-
 1
1 -
2
-
3
-
4
-
5
-
6
-
7
-
8
-
 9
9 -
 10
10 -
 11
11 -
 12
12 -
 13
13 -
 14
14 -
 15
15 -
 16
16 -
 17
17 -
 18
18 -
 19
19 -
20
-
21
-
22
-
23
-
24
-
25
-
26
-
27
-
28
-
29
-
30
-
31
-
32
-
33
-
34
-
35
-
36
-
37
-
38
-
39
-
40
-
41
-
42
-
43
-
44
-
45
-
46
-
47
-
48
-
49
-
50
-
51
-
52
-
53
-
54
-
55
-
56
-
57
-
58
-
59
-
60
-
61
-
62
-
63
-
64
-
65
-
66
-
67
-
68
-
69
-
70
-
71
-
72
-
73
-
74
-
75
-
76
-
77
-
78
-
79
-
80
-
81
-
82
-
83
-
84
-
85
-
86
-
87
-
88
-
89
-
90
-
91
-
92
-
93
-
94
-
95
-
96
-
97
-
98
-
99
-
100
-
101
-
102
-
103
-
104
-
105
-
106
-
107
-
108
-
109
-
110
-
111
-
112
-
113
-
114
-
115
-
116
-
117
-
118
-
119
-
120
-
121
-
122
-
123
-
124
-
125
-
126
 |
 |
