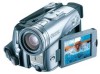
Canon Optura 40 OPTURA40 OPTURA30 Instruction Manual - Page 25
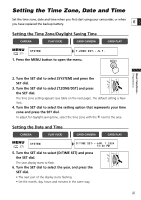
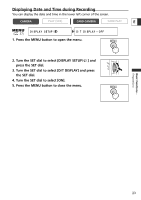
Press the MENU button to open the menu. - 20 manual
 |
UPC - 013803040906
View all Canon Optura 40 manuals
Add to My Manuals
Save this manual to your list of manuals |
Page 25 highlights
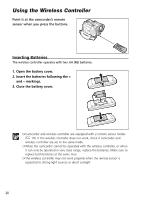
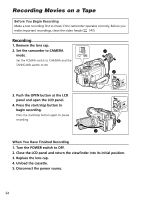
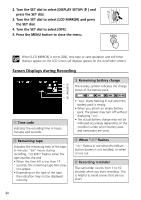
❍ Wait until the tape counter stops completely before you start recording. ❍ When you do not remove the cassette, you can record the next scene without producing any noise or blank sections between the recordings even if you turn the camcorder off. E ❍ Bright light may make it difficult to use the LCD screen. In such case, use the viewfinder instead. ❍ You can rotate the LCD panel. Make sure to open the LCD panel at 90 degrees before rotating it. Basic Functions Recording ❍ When recording near loud sounds (such as fireworks, drums or concerts), sound may become distorted or may be recorded not in the actual sound level. This is not a malfunction. OPTURA40: The audio recording level can also be adjusted manually ( 60). ❍ The camcorder will shut off after 5 minutes when left in record pause mode to protect tape and video heads. " AUTO POWER OFF" appears 20 seconds before shutoff. To continue recording, turn the POWER switch to OFF and then back to CAMERA. ❍ About the LCD and viewfinder screen: The screens are produced with extremely high-precision manufacturing techniques, with more than 99.99% of the pixels operating to specification. Less than 0.01% of the pixels may occasionally misfire or appear as black or green dots. This has no effect on the recorded image and does not constitute a malfunction. Allowing the Subject to Monitor the LCD Screen You can rotate the LCD panel so that the screen faces in the same direction as the lens. The viewfinder switches on allowing you to use the viewfinder while the subject can monitor the screen. The image appears mirror reversed (LCD MIRROR ON). However, you can choose to display the image as it is being recorded (LCD MIRROR OFF). CAMERA PLAY (VCR) CARD CAMERA CARD PLAY ( 37) DISPLAY SETUP/ LCD MIRROR•••ON 1. Press the MENU button to open the menu. 25
-
 1
1 -
2
-
3
-
4
-
5
-
6
-
7
-
8
-
9
-
10
-
11
-
12
-
13
-
14
-
15
-
16
-
17
-
18
-
19
-
 20
20 -
 21
21 -
 22
22 -
 23
23 -
 24
24 -
 25
25 -
 26
26 -
 27
27 -
 28
28 -
 29
29 -
 30
30 -
31
-
32
-
33
-
34
-
35
-
36
-
37
-
38
-
39
-
40
-
41
-
42
-
43
-
44
-
45
-
46
-
47
-
48
-
49
-
50
-
51
-
52
-
53
-
54
-
55
-
56
-
57
-
58
-
59
-
60
-
61
-
62
-
63
-
64
-
65
-
66
-
67
-
68
-
69
-
70
-
71
-
72
-
73
-
74
-
75
-
76
-
77
-
78
-
79
-
80
-
81
-
82
-
83
-
84
-
85
-
86
-
87
-
88
-
89
-
90
-
91
-
92
-
93
-
94
-
95
-
96
-
97
-
98
-
99
-
100
-
101
-
102
-
103
-
104
-
105
-
106
-
107
-
108
-
109
-
110
-
111
-
112
-
113
-
114
-
115
-
116
-
117
-
118
-
119
-
120
-
121
-
122
-
123
-
124
-
125
-
126
-
127
-
128
-
129
-
130
-
131
-
132
-
133
-
134
-
135
-
136
-
137
-
138
-
139
-
140
-
141
-
142
-
143
-
144
-
145
-
146
-
147
-
148
-
149
-
150
-
151
-
152
-
153
-
154
-
155
-
156
-
157
-
158
-
159
-
160
-
161
-
162
-
163
-
164
-
165
-
166
 |
 |
