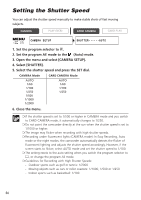
Canon Optura 40 OPTURA40 OPTURA30 Instruction Manual - Page 61
Open the menu and select [AUDIO SETUP]. Select [MIC ATT], set it to [ON], and close the menu.
 |
UPC - 013803040906
View all Canon Optura 40 manuals
Add to My Manuals
Save this manual to your list of manuals |
Page 61 highlights
❍ About the audio level indicator: When [MIC LEVEL] is set to [AUTO], the audio level indicator switches on and off with each press of the AUDIO LEVEL button. E -dB40 12 0 [MIC LEVEL] M is set to [MANUAL] Level indicator Guide (green bar) ❍ The audio level can be changed when the green bar is displayed. We recommend hiding the bar when you have finished adjusting to prevent accidental changes. ❍ The microphone level resets to [AUTO] when you switch the program selector to [. ❍ We recommend using headphones when manually adjusting the audio level. Microphone Attenuator Use the microphone attenuator if you need to lower the volume level or correct audio distortion during recording or audio dubbing. Check the audio levels with headphones. CAMERA PLAY (VCR) * * Only when [AUDIO DUB.] is set to [MIC IN]. CARD CAMERA CARD PLAY ( 37) AUDIO SETUP MIC ATT OFF Open the menu and select [AUDIO SETUP]. Select [MIC ATT], set it to [ON] and close the menu. Advanced Functions Recording 61
-
 1
1 -
2
-
3
-
4
-
5
-
6
-
7
-
8
-
9
-
10
-
11
-
12
-
13
-
14
-
15
-
16
-
17
-
18
-
19
-
20
-
21
-
22
-
23
-
24
-
25
-
26
-
27
-
28
-
29
-
30
-
31
-
32
-
33
-
34
-
35
-
36
-
37
-
38
-
39
-
40
-
41
-
42
-
43
-
44
-
45
-
46
-
47
-
48
-
49
-
50
-
51
-
52
-
53
-
54
-
55
-
 56
56 -
 57
57 -
 58
58 -
 59
59 -
 60
60 -
 61
61 -
 62
62 -
 63
63 -
 64
64 -
 65
65 -
 66
66 -
67
-
68
-
69
-
70
-
71
-
72
-
73
-
74
-
75
-
76
-
77
-
78
-
79
-
80
-
81
-
82
-
83
-
84
-
85
-
86
-
87
-
88
-
89
-
90
-
91
-
92
-
93
-
94
-
95
-
96
-
97
-
98
-
99
-
100
-
101
-
102
-
103
-
104
-
105
-
106
-
107
-
108
-
109
-
110
-
111
-
112
-
113
-
114
-
115
-
116
-
117
-
118
-
119
-
120
-
121
-
122
-
123
-
124
-
125
-
126
-
127
-
128
-
129
-
130
-
131
-
132
-
133
-
134
-
135
-
136
-
137
-
138
-
139
-
140
-
141
-
142
-
143
-
144
-
145
-
146
-
147
-
148
-
149
-
150
-
151
-
152
-
153
-
154
-
155
-
156
-
157
-
158
-
159
-
160
-
161
-
162
-
163
-
164
-
165
-
166
 |
 |
