Canon PIXMA SELPHY DS700 DS700 Photo Print Guide - Page 21
Prepare to load paper., Load the paper.
 |
View all Canon PIXMA SELPHY DS700 manuals
Add to My Manuals
Save this manual to your list of manuals |
Page 21 highlights
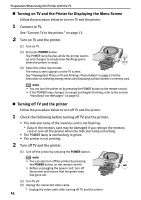
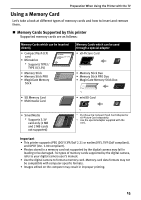
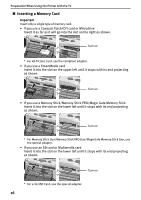
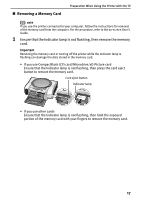
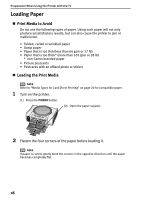
Preparation When Using the Printer with the TV 3 Prepare to load paper. (1) Slide the cover open switch toward the right to open the cover. (2) Ensure that the paper thickness lever is set to the right. note Set the lever on the left only if ink smudges or the printed surface is stained. (3) Close the cover. 4 Load the paper. (1) Insert the paper into the paper support with print side facing up. When loading the credit card sized paper, load sheets * in the portrait position (feed from the short side) Important (3) Slide the paper guide against the left side of the stack of paper. * During printing, part of sheet is ejected from the back of the printer. Leave at least 8cm (3.1 in) clear space at the back of the printer. (2) Align the paper with the right edge of the paper support and insert the paper until it is fully inserted. • 101.6 × 152.4mm/ 4"×6" paper • Photo stickers Shorter margin note • Do not stack more than 10 sheets in the paper output tray. • Do not touch the printed surface until the ink dries. For specific drying times, refer to the instructions packaged with your media. 19
-
 1
1 -
2
-
3
-
4
-
5
-
6
-
7
-
8
-
9
-
10
-
11
-
12
-
13
-
14
-
15
-
 16
16 -
 17
17 -
 18
18 -
 19
19 -
 20
20 -
 21
21 -
 22
22 -
 23
23 -
 24
24 -
 25
25 -
 26
26 -
27
-
28
-
29
-
30
-
31
-
32
-
33
-
34
-
35
-
36
-
37
-
38
-
39
-
40
-
41
-
42
-
43
-
44
-
45
-
46
-
47
-
48
-
49
-
50
-
51
-
52
-
53
-
54
-
55
-
56
-
57
-
58
-
59
-
60
-
61
-
62
-
63
-
64
-
65
-
66
-
67
-
68
-
69
-
70
-
71
-
72
-
73
-
74
-
75
-
76
-
77
-
78
-
79
-
80
-
81
-
82
-
83
-
84
-
85
-
86
-
87
 |
 |
