Canon PIXMA SELPHY DS700 DS700 Photo Print Guide - Page 58
Printing the Nozzle Check Pattern
 |
View all Canon PIXMA SELPHY DS700 manuals
Add to My Manuals
Save this manual to your list of manuals |
Page 58 highlights
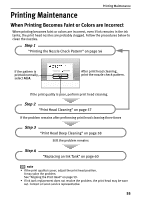
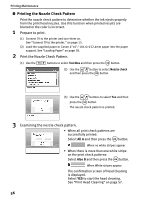
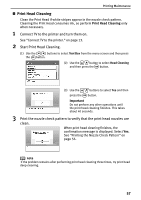
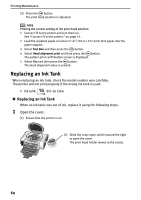
Printing Maintenance „ Printing the Nozzle Check Pattern Print the nozzle check pattern to determine whether the ink ejects properly from the print head nozzles. Use this function when printed results are blurred or the color is incorrect. 1 Prepare to print. (1) Connect TV to the printer and turn them on. See "Connect TV to the printer." on page 13. (2) Load the supplied paper or Canon 4"×6"/ 101.6×152.4mm paper into the paper support. See "Loading Paper" on page 18. 2 Print the Nozzle Check Pattern. (1) Use the buttons to select Tool Box and then press the button. (2) Use the button to select Nozzle check and then press the button. (3) Use the buttons to select Yes and then press the button. The nozzle check pattern is printed. 3 Examining the nozzle check pattern. • When all print check patterns are successfully printed: Select All A and then press the button. When no white stripes appear • When there is more than one white stripe on the print check patterns: Select Also B and then press the button. When White stripes appear The confirmation screen of Head Cleaning is displayed. Select YES to start the head cleaning. See "Print Head Cleaning" on page 57. 56
-
 1
1 -
2
-
3
-
4
-
5
-
6
-
7
-
8
-
9
-
10
-
11
-
12
-
13
-
14
-
15
-
16
-
17
-
18
-
19
-
20
-
21
-
22
-
23
-
24
-
25
-
26
-
27
-
28
-
29
-
30
-
31
-
32
-
33
-
34
-
35
-
36
-
37
-
38
-
39
-
40
-
41
-
42
-
43
-
44
-
45
-
46
-
47
-
48
-
49
-
50
-
51
-
52
-
 53
53 -
 54
54 -
 55
55 -
 56
56 -
 57
57 -
 58
58 -
 59
59 -
 60
60 -
 61
61 -
 62
62 -
 63
63 -
64
-
65
-
66
-
67
-
68
-
69
-
70
-
71
-
72
-
73
-
74
-
75
-
76
-
77
-
78
-
79
-
80
-
81
-
82
-
83
-
84
-
85
-
86
-
87
 |
 |
