Canon PIXMA SELPHY DS700 DS700 Photo Print Guide - Page 44
Borderless Printing, 10×15cm/4×6, Paper size, Layout, VIVID Photo, Noise, reduction, Color Adjust,
 |
View all Canon PIXMA SELPHY DS700 manuals
Add to My Manuals
Save this manual to your list of manuals |
Page 44 highlights
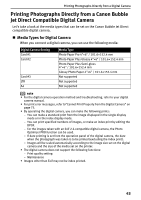
Printing Photographs Directly from a Digital Camera About "Layout" When "Default setting" (selections based on the printer setting) is selected, the printer operates based on the "Borderless Printing" setting made using the remote control. When 10×15cm/4"×6" is selected from "Paper size", "2-up", "4-up", "9-up", and "16-up" options may be available in "Layout". note Printing on Photo Stickers Specify the Paper size, Paper type, and layout for the Photo Stickers provided by Canon. Paper size: 10×15cm/4"×6" Paper type: Photo layout: 16-up For instructions on how to load Photo Stickers, see "Loading Paper" on page 18. About "Image optimize" When "Default setting" (selections based on the printer setting) is selected, the printer operates based on the "POP" and "VIVID Photo", "Noise reduction", "Color Adjust" settings made using the remote control. If you use a Canon PictBridge- compatible camera, you can select "VIVID", "NR", or "VIVID+NR". (Note that these options cannot be selected for some models.) note • When "POP" (Photo Optimizer PRO) is selected, automatically corrects the image brightness and color. • When "VIVID" is selected, green and blue portions of photos are printed vividly. • When "NR" (Noise Reduction) is selected, noise in blue portions, such as the sky, and dark portions is removed. • When "VIVID+NR" is selected, functions of both "VIVID" and "NR" are performed. About "Date print" "Date Print" depends on the settings made using the controls of the camera. note • This printer can handle only Exif/JPEG image data to produce photos using PictBridge. • Never disconnect the USB cable during printing. • When disconnecting the USB cable between the digital camera and printer, follow the instructions given in the Instruction Manual of the camera. • Controls of the digital camera cannot be used for the following: - Print quality setting - Printer maintenance 42
-
 1
1 -
2
-
3
-
4
-
5
-
6
-
7
-
8
-
9
-
10
-
11
-
12
-
13
-
14
-
15
-
16
-
17
-
18
-
19
-
20
-
21
-
22
-
23
-
24
-
25
-
26
-
27
-
28
-
29
-
30
-
31
-
32
-
33
-
34
-
35
-
36
-
37
-
38
-
 39
39 -
 40
40 -
 41
41 -
 42
42 -
 43
43 -
 44
44 -
 45
45 -
 46
46 -
 47
47 -
 48
48 -
 49
49 -
50
-
51
-
52
-
53
-
54
-
55
-
56
-
57
-
58
-
59
-
60
-
61
-
62
-
63
-
64
-
65
-
66
-
67
-
68
-
69
-
70
-
71
-
72
-
73
-
74
-
75
-
76
-
77
-
78
-
79
-
80
-
81
-
82
-
83
-
84
-
85
-
86
-
87
 |
 |
