Canon S60 PowerShot S60 Camera User Guide - Page 37
Changing the Resolution and Compression - ccd
 |
UPC - 013803041620
View all Canon S60 manuals
Add to My Manuals
Save this manual to your list of manuals |
Page 37 highlights
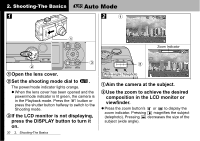
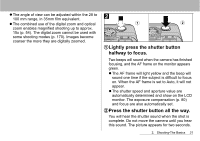
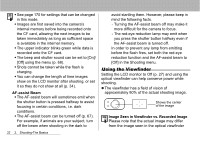
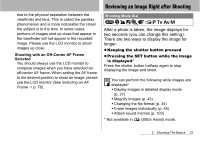
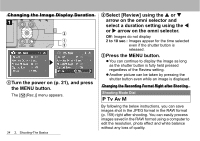
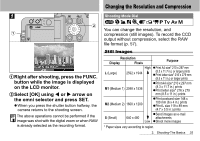
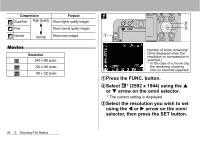
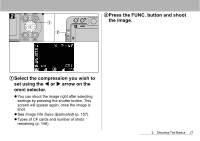
Changing the Resolution and Compression Shooting Mode Dial b a aRight after shooting, press the FUNC. button while the image is displayed on the LCD monitor. bSelect [OK] using W or X arrow on the omni selector and press SET. z When you press the shutter button halfway, the camera returns to the shooting screen. The above operations cannot be performed if the image was shot with the digital zoom or when RAW is already selected as the recording format. You can change the resolution, and compression (still images). To record the CCD output without compression, select the RAW file format (p. 57). Still Images Resolution Display Pixels Purpose L (Large) High zPrint A4 size* 210 x 297 mm 2592 x 1944 (8.3 x 11.7 in.) or larger prints zPrint letter size* 216 x 279 mm (8.5 x 11 in.) or larger prints M1 (Medium 1) 2048 x 1536 zPrint A4 size* 210 x 297 mm (8.3 x 11.7 in.) prints zPrint letter size* 216 x 279 mm (8.5 x 11 in.) prints M2 (Medium 2) 1600 x 1200 zPrint postcard size 148 x 100 mm (6 x 4 in.) prints zPrint L size 119 x 89 mm (4.7 x 3.5 in.) prints S (Small) 640 x 480 zSend images as e-mail attachments Low zShoot more images * Paper sizes vary according to region. 2. Shooting-The Basics 35
-
 1
1 -
2
-
3
-
4
-
5
-
6
-
7
-
8
-
9
-
10
-
11
-
12
-
13
-
14
-
15
-
16
-
17
-
18
-
19
-
20
-
21
-
22
-
23
-
24
-
25
-
26
-
27
-
28
-
29
-
30
-
31
-
 32
32 -
 33
33 -
 34
34 -
 35
35 -
 36
36 -
 37
37 -
 38
38 -
 39
39 -
 40
40 -
 41
41 -
 42
42 -
43
-
44
-
45
-
46
-
47
-
48
-
49
-
50
-
51
-
52
-
53
-
54
-
55
-
56
-
57
-
58
-
59
-
60
-
61
-
62
-
63
-
64
-
65
-
66
-
67
-
68
-
69
-
70
-
71
-
72
-
73
-
74
-
75
-
76
-
77
-
78
-
79
-
80
-
81
-
82
-
83
-
84
-
85
-
86
-
87
-
88
-
89
-
90
-
91
-
92
-
93
-
94
-
95
-
96
-
97
-
98
-
99
-
100
-
101
-
102
-
103
-
104
-
105
-
106
-
107
-
108
-
109
-
110
-
111
-
112
-
113
-
114
-
115
-
116
-
117
-
118
-
119
-
120
-
121
-
122
-
123
-
124
-
125
-
126
-
127
-
128
-
129
-
130
-
131
-
132
-
133
-
134
-
135
-
136
-
137
-
138
-
139
-
140
-
141
-
142
-
143
-
144
-
145
-
146
-
147
-
148
-
149
-
150
-
151
-
152
-
153
-
154
-
155
-
156
-
157
-
158
-
159
-
160
-
161
-
162
-
163
-
164
-
165
-
166
-
167
-
168
-
169
-
170
-
171
-
172
-
173
-
174
-
175
 |
 |
