Canon XF305 Canon XF Utility (Windows) Version 1.0 Instruction Manual - Page 13
Importing Clips into the Computer
 |
View all Canon XF305 manuals
Add to My Manuals
Save this manual to your list of manuals |
Page 13 highlights
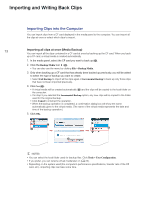
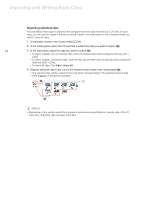
Importing and Writing Back Clips Importing Clips into the Computer ImportingandWritingBackClips You can import clips from a CF card displayed in the media panel to the computer. You can import all the clips at once or select which clips to import. 13 Importing all clips at once (Media Backup) You can import all the clips contained in a CF card at once by backing up the CF card. When you back up a CF card, a virtual media is created automatically. 1. In the media panel, select the CF card you want to back up (³). 2. Click the Backup Media tool (·). • You can also use the menu by clicking File > Backup Media. 3. Only when backing up a CF card that has already been backed up previously, you will be asked to select the type of backup you want to create. • Select Full Backup to import all the clips again or Incremental Backup to back up only those clips that have not been imported previously. 4. Click Yes (»). • A virtual media will be created automatically (¿) and the clips will be copied to the local folder on the computer. • If in step 3 you selected the Incremental Backup option, any new clips will be copied to the folder used for the original backup. • Click Cancel to interrupt the operation. • When the backup operation is completed, a confirmation dialog box will show the name automatically given to the virtual media. (The name of the virtual media represents the date and time of the backup operation.) 5. Click OK. · ³ ¿ » NOTES • You can select the local folder used for backup files. Click Tools > User Configuration. • If you prefer, you can rename virtual media later on (0 24). • Depending on the system used (the computer's performance specifications, transfer rate of the CF card, etc.), importing clips can take some time.
-
 1
1 -
2
-
3
-
4
-
5
-
6
-
7
-
 8
8 -
 9
9 -
 10
10 -
 11
11 -
 12
12 -
 13
13 -
 14
14 -
 15
15 -
 16
16 -
 17
17 -
 18
18 -
19
-
20
-
21
-
22
-
23
-
24
-
25
-
26
-
27
-
28
-
29
-
30
-
31
-
32
-
33
-
34
-
35
-
36
-
37
-
38
 |
 |
