Canon imagePROGRAF iPF6450 Calibration Guide - Page 16
Automatic Cutting Settings
 |
View all Canon imagePROGRAF iPF6450 manuals
Add to My Manuals
Save this manual to your list of manuals |
Page 16 highlights
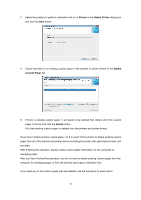
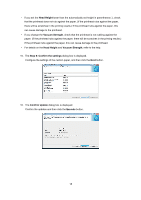
Configure the following settings as necessary, and then click the Next button. Setting Details Configures the method for cutting roll paper when it is ejected after printing. ・ Automatic Cut: Rolls are automatically cut by the cutter unit. Automatic ・ Eject Cut: When the Cut key is pressed on the printer control panel, the Cutting rolls are cut by the cutter unit. Select this if you do not want the printed Settings material to drop immediately after printing, such as to wait for the ink to dry. ・ User Cut: Cutting is not performed by the cutter unit. Cut the rolls using scissors after each sheet. Select this for paper that cannot be cut by the cutter unit. Specify the time that the printer waits for ink to dry, as needed. Drying Time ・ Off: Ejects immediately after printing finishes. ・ 30 sec./1 min./3 min./5 min./10 min./30 min./60 min.: Ejects after the specified time has elapsed after printing finishes. Borderless Printing Configures whether or not to permit borderless printing. ・ Permit: Borderless printing is permitted. ・ Deny: Borderless printing is denied. ・ Depending on the paper, there are types that cannot be cut by the cutter unit, and types that speed deterioration of the blade and cause damage to the cutter. For thick paper, hard paper, etc. do not use the cutter unit, and instead cut the roll paper using scissors, etc. after printing. In this case, select User Cut as the Automatic Cutting Settings. ・ If borderless printing is performed on paper where the ink drying is poor, the cutter unit may leave scratches where it touches the printed surface, or may not cut correctly. In this kind of situation, configure the amount of time to wait for the ink to dry after printing using Drying Time. ・ For custom paper where there is a need to set the Automatic Cutting Settings to User Cut, set the Borderless Printing to Deny. 11. The Step 5: Configure the amount of ink used dialog box is displayed. First, click the Test Print button to perform a test print of each level. 16
-
 1
1 -
2
-
3
-
4
-
5
-
6
-
7
-
8
-
9
-
10
-
 11
11 -
 12
12 -
 13
13 -
 14
14 -
 15
15 -
 16
16 -
 17
17 -
 18
18 -
 19
19 -
 20
20 -
 21
21 -
22
-
23
-
24
-
25
-
26
-
27
-
28
-
29
-
30
-
31
-
32
-
33
-
34
-
35
 |
 |
