Canon imageRUNNER ADVANCE C5240A imageRUNNER ADVANCE C5200 Srs Basic Operation - Page 112
Cleaning the Dust Proof Glass
 |
View all Canon imageRUNNER ADVANCE C5240A manuals
Add to My Manuals
Save this manual to your list of manuals |
Page 112 highlights
Cleaning the Dust Proof Glass If the dust proof glass is dirty, print defects may occur on the print output. Follow the procedure described below to clean the dust proof glass. 1 Open the front cover, holding both sides. 2 Remove the dust proof glass cleaner from the rear side of the front cover by sliding it to the left side. * * Dust Proof Glass Cleaner 3 Hold the dust proof glass cleaner so that the pad on the tip is facing down, push it back as far as it goes, and then slowly move it up and down. Clean the four locations as shown below. There are marks on the main unit that indicate the cleaning locations. Check these marks when cleaning the dust proof glass. 112
-
 1
1 -
2
-
3
-
4
-
5
-
6
-
7
-
8
-
9
-
10
-
11
-
12
-
13
-
14
-
15
-
16
-
17
-
18
-
19
-
20
-
21
-
22
-
23
-
24
-
25
-
26
-
27
-
28
-
29
-
30
-
31
-
32
-
33
-
34
-
35
-
36
-
37
-
38
-
39
-
40
-
41
-
42
-
43
-
44
-
45
-
46
-
47
-
48
-
49
-
50
-
51
-
52
-
53
-
54
-
55
-
56
-
57
-
58
-
59
-
60
-
61
-
62
-
63
-
64
-
65
-
66
-
67
-
68
-
69
-
70
-
71
-
72
-
73
-
74
-
75
-
76
-
77
-
78
-
79
-
80
-
81
-
82
-
83
-
84
-
85
-
86
-
87
-
88
-
89
-
90
-
91
-
92
-
93
-
94
-
95
-
96
-
97
-
98
-
99
-
100
-
101
-
102
-
103
-
104
-
105
-
106
-
 107
107 -
 108
108 -
 109
109 -
 110
110 -
 111
111 -
 112
112 -
 113
113 -
 114
114 -
 115
115 -
 116
116 -
 117
117 -
118
-
119
-
120
-
121
-
122
-
123
-
124
-
125
-
126
-
127
-
128
-
129
-
130
-
131
-
132
-
133
-
134
-
135
-
136
-
137
-
138
-
139
-
140
-
141
-
142
-
143
-
144
-
145
-
146
-
147
-
148
-
149
-
150
-
151
-
152
-
153
-
154
-
155
-
156
-
157
-
158
-
159
-
160
-
161
-
162
-
163
-
164
-
165
-
166
-
167
-
168
-
169
-
170
-
171
-
172
-
173
-
174
-
175
-
176
-
177
-
178
-
179
-
180
-
181
-
182
-
183
-
184
-
185
-
186
-
187
-
188
-
189
-
190
-
191
-
192
-
193
-
194
-
195
-
196
-
197
-
198
-
199
-
200
-
201
-
202
-
203
-
204
 |
 |

112
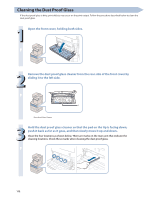
Cleaning the Dust Proof Glass
If the dust proof glass is dirty, print defects may occur on the print output. Follow the procedure described below to clean the
dust proof glass.
1
Open the front cover, holding both sides.
2
Remove the dust proof glass cleaner from the rear side of the front cover by
sliding it to the left side.
*
* Dust Proof Glass Cleaner
3
Hold the dust proof glass cleaner so that the pad on the tip is facing down,
push it back as far as it goes, and then slowly move it up and down.
Clean the four locations as shown below. There are marks on the main unit that indicate the
cleaning locations. Check these marks when cleaning the dust proof glass.