Canon imageRUNNER ADVANCE C5240A imageRUNNER ADVANCE C5200 Srs Basic Operation - Page 89
Replacing the Staple Case in the Saddle Stitcher Unit Booklet, Finisher-J1
 |
View all Canon imageRUNNER ADVANCE C5240A manuals
Add to My Manuals
Save this manual to your list of manuals |
Page 89 highlights
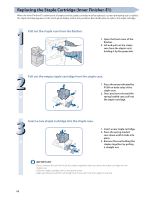
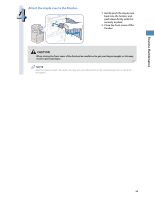
Routine Maintenance 6 Close the front cover of the finisher. When closing the front cover of the finisher, be careful not to get your fingers caught, as this may result in personal injury. After the cover is closed, the stapler unit may automatically perform a "dry" stapling operation to reposition the staples. Replacing the Staple Case in the Saddle Stitcher Unit (Booklet Finisher-J1) When the saddle stitcher unit of the Booklet Finisher-J1 is almost out of staples and the staple case must be replaced, a screen prompting you to replace the staple case appears on the touch panel display. Follow the procedure described below to replace the staple case. If necessary, remove all output paper in the booklet tray before replacing the staple cartridge of the saddle stitcher unit. • This procedure is necessary only if the Booklet Finisher-J1 is attached (the Booklet Finisher-J1 is an optional product). • We recommend that you order staple cases from your local authorized Canon dealer before your stock runs out. • Use only staple cases intended for use with this machine. • Remove the black part on the end before inserting the staple case. 89
-
 1
1 -
2
-
3
-
4
-
5
-
6
-
7
-
8
-
9
-
10
-
11
-
12
-
13
-
14
-
15
-
16
-
17
-
18
-
19
-
20
-
21
-
22
-
23
-
24
-
25
-
26
-
27
-
28
-
29
-
30
-
31
-
32
-
33
-
34
-
35
-
36
-
37
-
38
-
39
-
40
-
41
-
42
-
43
-
44
-
45
-
46
-
47
-
48
-
49
-
50
-
51
-
52
-
53
-
54
-
55
-
56
-
57
-
58
-
59
-
60
-
61
-
62
-
63
-
64
-
65
-
66
-
67
-
68
-
69
-
70
-
71
-
72
-
73
-
74
-
75
-
76
-
77
-
78
-
79
-
80
-
81
-
82
-
83
-
 84
84 -
 85
85 -
 86
86 -
 87
87 -
 88
88 -
 89
89 -
 90
90 -
 91
91 -
 92
92 -
 93
93 -
 94
94 -
95
-
96
-
97
-
98
-
99
-
100
-
101
-
102
-
103
-
104
-
105
-
106
-
107
-
108
-
109
-
110
-
111
-
112
-
113
-
114
-
115
-
116
-
117
-
118
-
119
-
120
-
121
-
122
-
123
-
124
-
125
-
126
-
127
-
128
-
129
-
130
-
131
-
132
-
133
-
134
-
135
-
136
-
137
-
138
-
139
-
140
-
141
-
142
-
143
-
144
-
145
-
146
-
147
-
148
-
149
-
150
-
151
-
152
-
153
-
154
-
155
-
156
-
157
-
158
-
159
-
160
-
161
-
162
-
163
-
164
-
165
-
166
-
167
-
168
-
169
-
170
-
171
-
172
-
173
-
174
-
175
-
176
-
177
-
178
-
179
-
180
-
181
-
182
-
183
-
184
-
185
-
186
-
187
-
188
-
189
-
190
-
191
-
192
-
193
-
194
-
195
-
196
-
197
-
198
-
199
-
200
-
201
-
202
-
203
-
204
 |
 |
