Canon imageRUNNER ADVANCE C5240A imageRUNNER ADVANCE C5200 Srs Basic Operation - Page 176
Specifying the File Server on, the Touch Panel Display, Browsing
 |
View all Canon imageRUNNER ADVANCE C5240A manuals
Add to My Manuals
Save this manual to your list of manuals |
Page 176 highlights
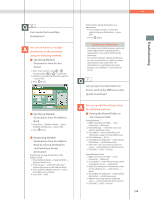
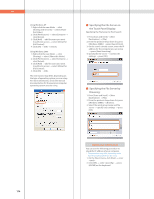
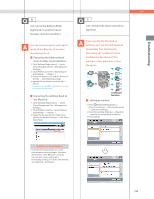
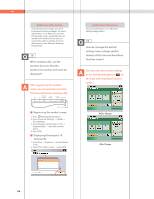
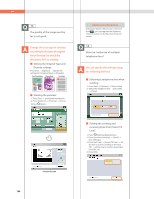
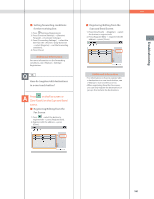
Q&A Using Windows XP 1. Right-click the new folder click [Sharing and Security] select [Share this folder]. 2. Click [Permissions] select Everyone click [Delete]. 3. Click [Add] add the users you want to authorize access select [Allow] for [Full Control]. 4. Click [OK] [OK] [Close]. Using Windows 2000 1. Right-click the new folder click [Sharing] select [Share this folder]. 2. Click [Permissions] select Everyone click [Delete]. 3. Click [Add] add the users you want to authorize access select [Allow] for [Full Control]. 4. Click [OK] [OK]. The item names may differ, depending on the type of operating system you are using. For more information, check the manual documentation for the personal computer operating system you are using. ˙ Specifying the File Server on the Touch Panel Display: Specifying the File Server by Host Search: 1. Press [Scan and Send] [New Destination] [File]. 2. From the protocol drop-down list, press [Windows (SMB)] press [Search Host]. 3. On the search criteria screen, enter the IP address for the computer you are using press [Start Searching]. 4. Specify the file server confirm the settings press [OK]. ˙ Specifying the File Server by Browsing: 1. Press [Scan and Send] [New Destination] [File]. 2. From the protocol drop-down list, press [Windows (SMB)] [Browse]. 3. Select the work group name and file server specify each settings press [OK]. Additional Information You can use the following procedure to check the IP address of your computer. * The procedures may differ, depending on the type of operating system you are using. 1. On the [Start] menu, click [Run] enter . 2. Click [OK] enter press [ENTER] on the keyboard. 176
-
 1
1 -
2
-
3
-
4
-
5
-
6
-
7
-
8
-
9
-
10
-
11
-
12
-
13
-
14
-
15
-
16
-
17
-
18
-
19
-
20
-
21
-
22
-
23
-
24
-
25
-
26
-
27
-
28
-
29
-
30
-
31
-
32
-
33
-
34
-
35
-
36
-
37
-
38
-
39
-
40
-
41
-
42
-
43
-
44
-
45
-
46
-
47
-
48
-
49
-
50
-
51
-
52
-
53
-
54
-
55
-
56
-
57
-
58
-
59
-
60
-
61
-
62
-
63
-
64
-
65
-
66
-
67
-
68
-
69
-
70
-
71
-
72
-
73
-
74
-
75
-
76
-
77
-
78
-
79
-
80
-
81
-
82
-
83
-
84
-
85
-
86
-
87
-
88
-
89
-
90
-
91
-
92
-
93
-
94
-
95
-
96
-
97
-
98
-
99
-
100
-
101
-
102
-
103
-
104
-
105
-
106
-
107
-
108
-
109
-
110
-
111
-
112
-
113
-
114
-
115
-
116
-
117
-
118
-
119
-
120
-
121
-
122
-
123
-
124
-
125
-
126
-
127
-
128
-
129
-
130
-
131
-
132
-
133
-
134
-
135
-
136
-
137
-
138
-
139
-
140
-
141
-
142
-
143
-
144
-
145
-
146
-
147
-
148
-
149
-
150
-
151
-
152
-
153
-
154
-
155
-
156
-
157
-
158
-
159
-
160
-
161
-
162
-
163
-
164
-
165
-
166
-
167
-
168
-
169
-
170
-
 171
171 -
 172
172 -
 173
173 -
 174
174 -
 175
175 -
 176
176 -
 177
177 -
 178
178 -
 179
179 -
 180
180 -
 181
181 -
182
-
183
-
184
-
185
-
186
-
187
-
188
-
189
-
190
-
191
-
192
-
193
-
194
-
195
-
196
-
197
-
198
-
199
-
200
-
201
-
202
-
203
-
204
 |
 |
