Canon s2is ImageBrowser 5.2 Software User Guide - Page 107
Converting RAW Images 2/5
 |
UPC - 013803051629
View all Canon s2is manuals
Add to My Manuals
Save this manual to your list of manuals |
Page 107 highlights
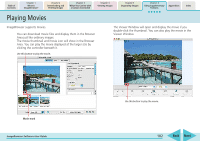
Table of Contents Chapter 1 What is ImageBrowser? Chapter 2 Downloading and Printing Images Chapter 3 What You Can Do with a Camera Connected Chapter 4 Viewing Images Chapter 5 Organizing Images Chapter 6 Using Supplementary Features Appendices Index Converting RAW Images (2/5) ■ Navigator Window You can change the area of a preview image that is zoomed in the main window by clicking this red mark and dragging it. ■ Image Quality Adjustment Window You can adjust the brightness, contrast and coloration of a RAW image as it is converted. See the Features of the Image Quality Adjustment Window on the following page for details. 3. Adjust the image quality as required in the Image Quality Adjustment Window. 4. Click the [2. Save] tab in the main window, set the image type and save destination, and then click [Save]. Selects images that will be saved with the same settings (All images, or images marked with a check in the main window). Sets the image type, compression ratio, and resolution. Sets the destination folder for the image file. You can change the image file name. ImageBrowser Software User Guide An ICC Profile is color matching data that heightens color reproduction. You can embed it in the file if you wish. (Please refer to the user guide for the software bundled with your camera to see whether your camera supports this function.) 5. Click the [3. Exit] tab and click [OK]. 107 Back Next
-
 1
1 -
2
-
3
-
4
-
5
-
6
-
7
-
8
-
9
-
10
-
11
-
12
-
13
-
14
-
15
-
16
-
17
-
18
-
19
-
20
-
21
-
22
-
23
-
24
-
25
-
26
-
27
-
28
-
29
-
30
-
31
-
32
-
33
-
34
-
35
-
36
-
37
-
38
-
39
-
40
-
41
-
42
-
43
-
44
-
45
-
46
-
47
-
48
-
49
-
50
-
51
-
52
-
53
-
54
-
55
-
56
-
57
-
58
-
59
-
60
-
61
-
62
-
63
-
64
-
65
-
66
-
67
-
68
-
69
-
70
-
71
-
72
-
73
-
74
-
75
-
76
-
77
-
78
-
79
-
80
-
81
-
82
-
83
-
84
-
85
-
86
-
87
-
88
-
89
-
90
-
91
-
92
-
93
-
94
-
95
-
96
-
97
-
98
-
99
-
100
-
101
-
 102
102 -
 103
103 -
 104
104 -
 105
105 -
 106
106 -
 107
107 -
 108
108 -
 109
109 -
 110
110 -
 111
111 -
 112
112 -
113
-
114
-
115
-
116
-
117
-
118
-
119
 |
 |
