Canon s2is ImageBrowser 5.2 Software User Guide - Page 39
Setting the DPOF Print Settings 2 / 2
 |
UPC - 013803051629
View all Canon s2is manuals
Add to My Manuals
Save this manual to your list of manuals |
Page 39 highlights
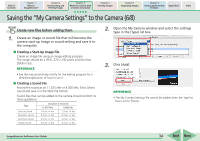
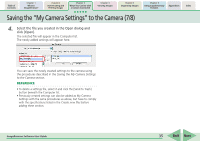
Table of Contents Chapter 1 What is ImageBrowser? Chapter 2 Downloading and Printing Images Chapter 3 What You Can Do with a Camera Connected Chapter 4 Viewing Images Setting the DPOF Print Settings (2/2) Chapter 5 Organizing Images Chapter 6 Using Supplementary Features Appendices Index Standard printing 1. Use the arrows next to the boxes to select the number of copies you want. The number under each image indicates the number of copies to print. Index printing 1. Select the check box under the image to include it in an index print. Allows you to specify the number of copies to print. The standard print icon displays when a number of copies is specified. 2. When you are done with your selections, click [Save to Camera]. This saves the information and completes the print setting. ImageBrowser Software User Guide Select the check box to include the image in the index print. The index print icon displays when a check mark is added to the image. 2. When you are done with your selections, click [Save to Camera]. This saves the information and completes the print setting. REFERENCE • The procedure described above also applies when the print type is [Both (Standard/Index)]. 39 Back Next
-
 1
1 -
2
-
3
-
4
-
5
-
6
-
7
-
8
-
9
-
10
-
11
-
12
-
13
-
14
-
15
-
16
-
17
-
18
-
19
-
20
-
21
-
22
-
23
-
24
-
25
-
26
-
27
-
28
-
29
-
30
-
31
-
32
-
33
-
 34
34 -
 35
35 -
 36
36 -
 37
37 -
 38
38 -
 39
39 -
 40
40 -
 41
41 -
 42
42 -
 43
43 -
 44
44 -
45
-
46
-
47
-
48
-
49
-
50
-
51
-
52
-
53
-
54
-
55
-
56
-
57
-
58
-
59
-
60
-
61
-
62
-
63
-
64
-
65
-
66
-
67
-
68
-
69
-
70
-
71
-
72
-
73
-
74
-
75
-
76
-
77
-
78
-
79
-
80
-
81
-
82
-
83
-
84
-
85
-
86
-
87
-
88
-
89
-
90
-
91
-
92
-
93
-
94
-
95
-
96
-
97
-
98
-
99
-
100
-
101
-
102
-
103
-
104
-
105
-
106
-
107
-
108
-
109
-
110
-
111
-
112
-
113
-
114
-
115
-
116
-
117
-
118
-
119
 |
 |
