Casio CLASSPad300 User Guide - Page 79
Other Data folder.
 |
UPC - 079767161071
View all Casio CLASSPad300 manuals
Add to My Manuals
Save this manual to your list of manuals |
Page 79 highlights
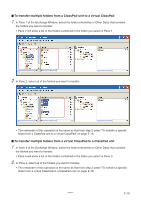
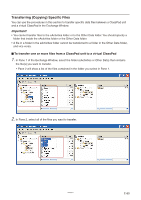
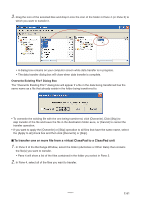
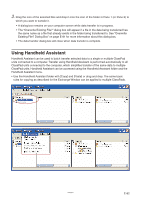
2. Drag the icon and drop it onto the icon of the virtual ClassPad in Pane 3 to which you want to transfer it. • This starts data transfer. All of the files in the folder you selected in step 1 will be transferred to the same level in the directory of the virtual ClassPad. If you selected the eActivities\main folder in step 1 for example, the eActivity files in the selected folder will be transferred to the eActivities\main folder of the virtual ClassPad. • A dialog box remains on your computer screen while data transfer is in progress. • The "Overwrite Existing File?" dialog box will appear if a file in the data being transferred from ClassPad folder has the same name as a file already stored in the virtual ClassPad folder. See "Overwrite Existing File? Dialog Box" on page E-75 for more information about this dialog box. • The data transfer dialog box will close when data transfer is complete. Note • Instead of dropping the icon onto the virtual ClassPad icon in step 2, you could also drop it into the virtual ClassPad's eActivities folder or Other Data folder. Just make sure you drop a folder containing eActivities into the eActivities folder, and a folder containing Other Data files into the Other Data folder. • If there is no folder with the same name in the virtual ClassPad you drop the folder into, a folder with that name is created automatically. 20060301 E-77
-
 1
1 -
2
-
3
-
4
-
5
-
6
-
7
-
8
-
9
-
10
-
11
-
12
-
13
-
14
-
15
-
16
-
17
-
18
-
19
-
20
-
21
-
22
-
23
-
24
-
25
-
26
-
27
-
28
-
29
-
30
-
31
-
32
-
33
-
34
-
35
-
36
-
37
-
38
-
39
-
40
-
41
-
42
-
43
-
44
-
45
-
46
-
47
-
48
-
49
-
50
-
51
-
52
-
53
-
54
-
55
-
56
-
57
-
58
-
59
-
60
-
61
-
62
-
63
-
64
-
65
-
66
-
67
-
68
-
69
-
70
-
71
-
72
-
73
-
 74
74 -
 75
75 -
 76
76 -
 77
77 -
 78
78 -
 79
79 -
 80
80 -
 81
81 -
 82
82 -
 83
83 -
 84
84 -
85
-
86
-
87
-
88
-
89
-
90
-
91
-
92
-
93
-
94
-
95
-
96
-
97
-
98
-
99
-
100
-
101
-
102
-
103
-
104
-
105
-
106
-
107
-
108
-
109
-
110
-
111
-
112
-
113
 |
 |
