Casio EX-F1 Owners Manual - Page 25
Snapshot Tutorial, Selecting a Recording Mode - samples
 |
UPC - 079767623401
View all Casio EX-F1 manuals
Add to My Manuals
Save this manual to your list of manuals |
Page 25 highlights
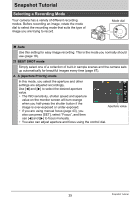
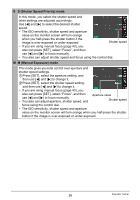
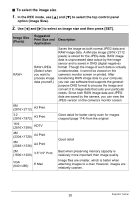
Snapshot Tutorial Selecting a Recording Mode Your camera has a variety of different recording modes. Before recording an image, rotate the mode dial to select the recording mode that suits the type of image you are trying to record. Mode dial t Auto Use this setting for easy image recording. This is the mode you normally should use (page 18). b BEST SHOT mode Simply select one of a collection of built-in sample scenes and the camera sets up automatically for beautiful images every time (page 67). A A (Aperture Priority) mode In this mode, you select the aperture and other settings are adjusted accordingly. Use [4] and [6] to select the desired aperture value. • The ISO sensitivity, shutter speed and aperture value on the monitor screen will turn orange when you half-press the shutter button if the image is over-exposed or under-exposed. Aperture value • If you are using manual focus (page 43), you also can press [SET], select "Focus", and then use [4] and [6] to focus manually. • You also can adjust aperture and focus using the control dial. 25 Snapshot Tutorial
-
 1
1 -
2
-
3
-
4
-
5
-
6
-
7
-
8
-
9
-
10
-
11
-
12
-
13
-
14
-
15
-
16
-
17
-
18
-
19
-
 20
20 -
 21
21 -
 22
22 -
 23
23 -
 24
24 -
 25
25 -
 26
26 -
 27
27 -
 28
28 -
 29
29 -
 30
30 -
31
-
32
-
33
-
34
-
35
-
36
-
37
-
38
-
39
-
40
-
41
-
42
-
43
-
44
-
45
-
46
-
47
-
48
-
49
-
50
-
51
-
52
-
53
-
54
-
55
-
56
-
57
-
58
-
59
-
60
-
61
-
62
-
63
-
64
-
65
-
66
-
67
-
68
-
69
-
70
-
71
-
72
-
73
-
74
-
75
-
76
-
77
-
78
-
79
-
80
-
81
-
82
-
83
-
84
-
85
-
86
-
87
-
88
-
89
-
90
-
91
-
92
-
93
-
94
-
95
-
96
-
97
-
98
-
99
-
100
-
101
-
102
-
103
-
104
-
105
-
106
-
107
-
108
-
109
-
110
-
111
-
112
-
113
-
114
-
115
-
116
-
117
-
118
-
119
-
120
-
121
-
122
-
123
-
124
-
125
-
126
-
127
-
128
-
129
-
130
-
131
-
132
-
133
-
134
-
135
-
136
-
137
-
138
-
139
-
140
-
141
-
142
-
143
-
144
-
145
-
146
-
147
-
148
-
149
-
150
-
151
-
152
-
153
-
154
-
155
-
156
-
157
-
158
-
159
-
160
-
161
-
162
-
163
-
164
-
165
-
166
-
167
-
168
-
169
-
170
-
171
-
172
-
173
-
174
-
175
-
176
-
177
-
178
-
179
-
180
-
181
-
182
-
183
-
184
-
185
 |
 |
