Casio EX-F1 Owners Manual - Page 54
Shooting with Bracketing Continuous Shutter
 |
UPC - 079767623401
View all Casio EX-F1 manuals
Add to My Manuals
Save this manual to your list of manuals |
Page 54 highlights
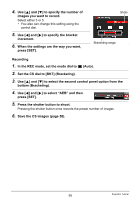
4. Use [4] and [6] to select the Slow Motion View playback speed you want and then press [SET]. You can select one of eight speeds, from 1 to 8. A higher level number specifies a faster playback speed. • You also can change this setting using the control dial. 5. Half-press the shutter button. This will start slow motion playback of pre-recorded images on the monitor screen. • Releasing the half-pressed shutter button will stop slow motion playback of the pre-recorded images. 6. When you want to save a pre-recorded image, press the shutter button the rest of the way. This will save the pre-recorded image that is on the monitor screen when you press the shutter button. NOTE • Slow Motion View does not operate correctly if you press the shutter button all the way down. Be sure to half-press the shutter button. After images are pre-recorded, press the shutter button the rest of the way down. Shooting with Bracketing Continuous Shutter With this mode, you can record multiple images while sequentially altering settings for each shot. Settings that can be altered are EV shift, white balance, and distance to the subject. . Using Auto Bracketing with Exposure Selected as the Variable (AE Bracketing) Specifying the Bracket Increment and Number of Images 1. In the REC mode, press [MENU]. 2. Use [4] and [6] to select "REC". 3. Use [8] and [2] to select "AE Bracketing" and then press [6]. 54 Snapshot Tutorial
-
 1
1 -
2
-
3
-
4
-
5
-
6
-
7
-
8
-
9
-
10
-
11
-
12
-
13
-
14
-
15
-
16
-
17
-
18
-
19
-
20
-
21
-
22
-
23
-
24
-
25
-
26
-
27
-
28
-
29
-
30
-
31
-
32
-
33
-
34
-
35
-
36
-
37
-
38
-
39
-
40
-
41
-
42
-
43
-
44
-
45
-
46
-
47
-
48
-
 49
49 -
 50
50 -
 51
51 -
 52
52 -
 53
53 -
 54
54 -
 55
55 -
 56
56 -
 57
57 -
 58
58 -
 59
59 -
60
-
61
-
62
-
63
-
64
-
65
-
66
-
67
-
68
-
69
-
70
-
71
-
72
-
73
-
74
-
75
-
76
-
77
-
78
-
79
-
80
-
81
-
82
-
83
-
84
-
85
-
86
-
87
-
88
-
89
-
90
-
91
-
92
-
93
-
94
-
95
-
96
-
97
-
98
-
99
-
100
-
101
-
102
-
103
-
104
-
105
-
106
-
107
-
108
-
109
-
110
-
111
-
112
-
113
-
114
-
115
-
116
-
117
-
118
-
119
-
120
-
121
-
122
-
123
-
124
-
125
-
126
-
127
-
128
-
129
-
130
-
131
-
132
-
133
-
134
-
135
-
136
-
137
-
138
-
139
-
140
-
141
-
142
-
143
-
144
-
145
-
146
-
147
-
148
-
149
-
150
-
151
-
152
-
153
-
154
-
155
-
156
-
157
-
158
-
159
-
160
-
161
-
162
-
163
-
164
-
165
-
166
-
167
-
168
-
169
-
170
-
171
-
172
-
173
-
174
-
175
-
176
-
177
-
178
-
179
-
180
-
181
-
182
-
183
-
184
-
185
 |
 |
