Casio EX-S770 Owners Manual - Page 256
Transferring documents from a Macintosh, Installing CASIO DATA TRANSPORT
 |
UPC - 079767622350
View all Casio EX-S770 manuals
Add to My Manuals
Save this manual to your list of manuals |
Page 256 highlights
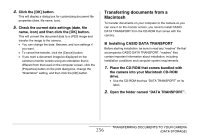
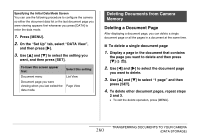
4. Click the [OK] button. This will display a dialog box for customizing document file properties (date, file name, icon). 5. Check the current data settings (date, file name, icon) and then click the [OK] button. This will convert the document data to a JPEG image and transfer the image to the camera. • You can change the date, filename, and icon settings if you want. • To cancel the transfer, click the [Cancel] button. • If you want a document image be displayed on the camera's monitor screen using an orientation that is different from that used on the computer screen, click the [Properties] button on the print dialog box, change the "Orientation" setting, and then click the [OK] button. Transferring documents from a Macintosh To transfer documents on your computer to the camera so you can view it on the monitor screen, you need to install CASIO DATA TRANSPORT from the CD-ROM that comes with the camera. ■ Installing CASIO DATA TRANSPORT Before starting installation, be sure to read any "readme" file that accompanies CASIO DATA TRANSPORT. "readme" files contain important information about installation, including installation conditions and computer system requirements. 1. Place the CD-ROM that comes bundled with the camera into your Macintosh CD-ROM drive. • Use the CD-ROM that has "DATA TRANSPORT" on its label. 2. Open the folder named "DATA TRANSPORT". 256 TRANSFERRING DOCUMENTS TO YOUR CAMERA (DATA STORAGE)
-
 1
1 -
2
-
3
-
4
-
5
-
6
-
7
-
8
-
9
-
10
-
11
-
12
-
13
-
14
-
15
-
16
-
17
-
18
-
19
-
20
-
21
-
22
-
23
-
24
-
25
-
26
-
27
-
28
-
29
-
30
-
31
-
32
-
33
-
34
-
35
-
36
-
37
-
38
-
39
-
40
-
41
-
42
-
43
-
44
-
45
-
46
-
47
-
48
-
49
-
50
-
51
-
52
-
53
-
54
-
55
-
56
-
57
-
58
-
59
-
60
-
61
-
62
-
63
-
64
-
65
-
66
-
67
-
68
-
69
-
70
-
71
-
72
-
73
-
74
-
75
-
76
-
77
-
78
-
79
-
80
-
81
-
82
-
83
-
84
-
85
-
86
-
87
-
88
-
89
-
90
-
91
-
92
-
93
-
94
-
95
-
96
-
97
-
98
-
99
-
100
-
101
-
102
-
103
-
104
-
105
-
106
-
107
-
108
-
109
-
110
-
111
-
112
-
113
-
114
-
115
-
116
-
117
-
118
-
119
-
120
-
121
-
122
-
123
-
124
-
125
-
126
-
127
-
128
-
129
-
130
-
131
-
132
-
133
-
134
-
135
-
136
-
137
-
138
-
139
-
140
-
141
-
142
-
143
-
144
-
145
-
146
-
147
-
148
-
149
-
150
-
151
-
152
-
153
-
154
-
155
-
156
-
157
-
158
-
159
-
160
-
161
-
162
-
163
-
164
-
165
-
166
-
167
-
168
-
169
-
170
-
171
-
172
-
173
-
174
-
175
-
176
-
177
-
178
-
179
-
180
-
181
-
182
-
183
-
184
-
185
-
186
-
187
-
188
-
189
-
190
-
191
-
192
-
193
-
194
-
195
-
196
-
197
-
198
-
199
-
200
-
201
-
202
-
203
-
204
-
205
-
206
-
207
-
208
-
209
-
210
-
211
-
212
-
213
-
214
-
215
-
216
-
217
-
218
-
219
-
220
-
221
-
222
-
223
-
224
-
225
-
226
-
227
-
228
-
229
-
230
-
231
-
232
-
233
-
234
-
235
-
236
-
237
-
238
-
239
-
240
-
241
-
242
-
243
-
244
-
245
-
246
-
247
-
248
-
249
-
250
-
 251
251 -
 252
252 -
 253
253 -
 254
254 -
 255
255 -
 256
256 -
 257
257 -
 258
258 -
 259
259 -
 260
260 -
 261
261 -
262
-
263
-
264
-
265
-
266
-
267
-
268
-
269
-
270
-
271
-
272
-
273
-
274
-
275
-
276
-
277
-
278
-
279
-
280
-
281
-
282
-
283
-
284
-
285
-
286
-
287
-
288
-
289
-
290
 |
 |
