Casio EX-Z30 Owners Manual - Page 72
OTHER RECORDING FUNCTIONS, IMPORTANT, NOTES, mode whenever you press
 |
View all Casio EX-Z30 manuals
Add to My Manuals
Save this manual to your list of manuals |
Page 72 highlights
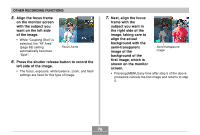
OTHER RECORDING FUNCTIONS IMPORTANT! • Sample scene number 4 is Coupling Shot scene (page 75). Sample scene number 5 is a Pre-shot scene (page 77). • BESTSHOT scenes were not recorded using this camera. They are provided as samples only. • Images recorded using a BESTSHOT scene may not produce the results you expected due to shooting conditions and other factors. • After selecting a BESTSHOT scene, you can change to a different one by pressing [SET] and then using [̇] and [̈] to scroll through available scenes. When the one you want is displayed, press [SET]. • You can change the camera settings that are made when you select a BESTSHOT scene. Note, however, that the BESTSHOT settings revert to their defaults when you select another BESTSHOT scene, change the recording mode, or turn off the camera. • Noise reduction processing is performed automatically when you are recording a night scene, fireworks, or other image that requires slow shutter speeds. Because of this, it takes longer to record images at lower shutter speeds. Make sure that you do not perform any camera button operations until the image recording operation is complete. NOTES • You can use the key customization feature (page 89) to configure the camera to enter the BESTSHOT mode whenever you press [̇] or [̈] while in the REC mode. • Operation guidance and the currently selected BESTSHOT scene appear on the display for about two seconds after you enter the BESTSHOT mode this way, or if the camera is in the BESTSHOT mode when you turn it on. 72
-
 1
1 -
2
-
3
-
4
-
5
-
6
-
7
-
8
-
9
-
10
-
11
-
12
-
13
-
14
-
15
-
16
-
17
-
18
-
19
-
20
-
21
-
22
-
23
-
24
-
25
-
26
-
27
-
28
-
29
-
30
-
31
-
32
-
33
-
34
-
35
-
36
-
37
-
38
-
39
-
40
-
41
-
42
-
43
-
44
-
45
-
46
-
47
-
48
-
49
-
50
-
51
-
52
-
53
-
54
-
55
-
56
-
57
-
58
-
59
-
60
-
61
-
62
-
63
-
64
-
65
-
66
-
 67
67 -
 68
68 -
 69
69 -
 70
70 -
 71
71 -
 72
72 -
 73
73 -
 74
74 -
 75
75 -
 76
76 -
 77
77 -
78
-
79
-
80
-
81
-
82
-
83
-
84
-
85
-
86
-
87
-
88
-
89
-
90
-
91
-
92
-
93
-
94
-
95
-
96
-
97
-
98
-
99
-
100
-
101
-
102
-
103
-
104
-
105
-
106
-
107
-
108
-
109
-
110
-
111
-
112
-
113
-
114
-
115
-
116
-
117
-
118
-
119
-
120
-
121
-
122
-
123
-
124
-
125
-
126
-
127
-
128
-
129
-
130
-
131
-
132
-
133
-
134
-
135
-
136
-
137
-
138
-
139
-
140
-
141
-
142
-
143
-
144
-
145
-
146
-
147
-
148
-
149
-
150
-
151
-
152
-
153
-
154
-
155
-
156
-
157
-
158
-
159
-
160
-
161
-
162
-
163
-
164
-
165
-
166
-
167
-
168
-
169
-
170
-
171
-
172
-
173
-
174
-
175
-
176
-
177
-
178
-
179
-
180
-
181
-
182
-
183
-
184
-
185
-
186
-
187
-
188
-
189
-
190
-
191
-
192
-
193
-
194
-
195
-
196
-
197
-
198
 |
 |
