Casio PX330 User Guide - Page 22
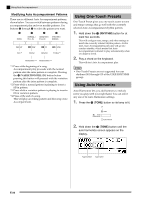
Using One-Touch Presets, Using Auto Harmonize
 |
View all Casio PX330 manuals
Add to My Manuals
Save this manual to your list of manuals |
Page 22 highlights
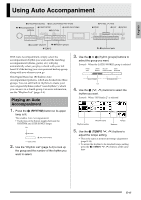
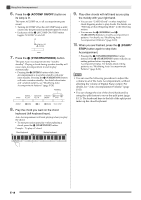
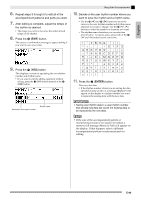
Using Auto Accompaniment Modifying Auto Accompaniment Patterns There are six different Auto Accompaniment patterns, shown below. You can switch between patterns during accompaniment play and even modify patterns. Use buttons 2 through 5 to select the pattern you want. 2 3 4 5 Intro *1 Normal Variation Ending *4 Normal fill-in *2 Variation fill-in *3 *1 Press at the beginning of a song. Accompaniment play proceeds with the normal pattern after the intro pattern is complete. Pressing the 4 (VARIATION/FILL-IN) button before pressing this button will proceed with the variation pattern after the intro pattern is complete. *2 Press while a normal pattern is playing to insert a fill-in pattern. *3 Press while a variation pattern is playing to insert a fill-in variation pattern. *4 Press at the end of a song. This will play an ending pattern and then stop Auto Accompaniment. Using One-Touch Presets One-Touch Preset gives you one-touch access to tone and tempo settings that go well with the currently selected Auto Accompaniment rhythm pattern. 1. Hold down the bl (RHYTHM) button for at least two seconds. This will configure tone, tempo, and other settings to match the currently selected rhythm pattern. At this time, Auto Accompaniment play also will go into synchro standby, which means that Auto Accompaniment will start to play automatically when you finger a chord. 2. Play a chord on the keyboard. This will start Auto Accompaniment play. NOTE • One-Touch Presets are not supported for user rhythms (001 through 010 of the USER RHYTHMS group). Using Auto Harmonize Auto Harmonize lets you add harmony to melody notes you play with your right hand. You can select any one of 12 Auto Harmonize settings. 1. Press the br (TONE) button so its lamp is lit. Lit 2. Hold down the br (TONE) button until the auto harmonize screen appears on the display. Type number Type name E-20
-
 1
1 -
2
-
3
-
4
-
5
-
6
-
7
-
8
-
9
-
10
-
11
-
12
-
13
-
14
-
15
-
16
-
 17
17 -
 18
18 -
 19
19 -
 20
20 -
 21
21 -
 22
22 -
 23
23 -
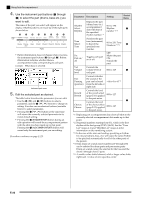 24
24 -
 25
25 -
 26
26 -
 27
27 -
28
-
29
-
30
-
31
-
32
-
33
-
34
-
35
-
36
-
37
-
38
-
39
-
40
-
41
-
42
-
43
-
44
-
45
-
46
-
47
-
48
-
49
-
50
-
51
-
52
-
53
-
54
-
55
-
56
-
57
-
58
-
59
-
60
-
61
-
62
-
63
-
64
-
65
-
66
-
67
-
68
-
69
-
70
-
71
-
72
 |
 |
