Casio PX330 User Guide - Page 23
Creating Your Own Original, Rhythms
 |
View all Casio PX330 manuals
Add to My Manuals
Save this manual to your list of manuals |
Page 23 highlights
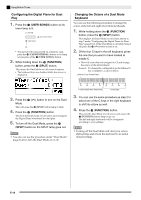
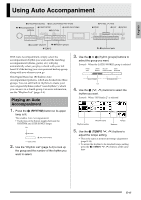
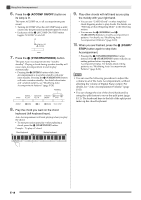
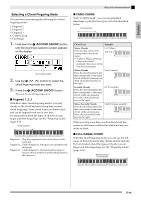
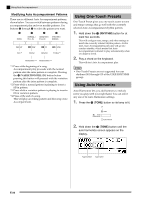
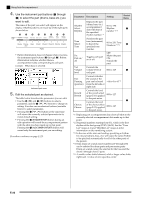
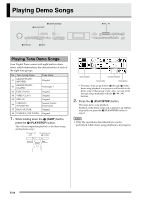
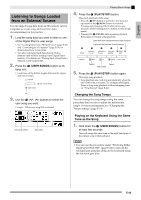
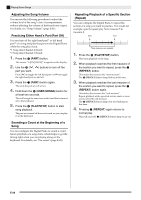
English 3. Use the bt (w, q) buttons to select the Auto Harmonize type you want. Type Number Type Name 00 Off 01 Duet 1 02 Duet 2 03 Country 04 Octave 05 5th 06 3-Way Open 07 3-Way Close 08 Strings 09 4-Way Open 10 4-Way Close 11 Block 12 Big Band Description Turns off Auto Harmonize. Adds close (separated by two to four degrees) one-note harmony below the melody note. Adds open (separated by more than 4 to 6 degrees) 1-note harmony below the melody note. Adds country style harmony. Adds the note from the next lower octave. Adds the fifth degree note. Adds 2-note open harmony, for a total of three notes. Adds 2-note close harmony, for a total of three notes. Adds harmony that is optimal for strings. Adds 3-note open harmony, for a total of four notes. Adds 3-note close harmony, for a total of four notes. Adds block chord notes. Adds big band style harmony. 4. Press the br (TONE) button. This will exit the auto harmonize screen. 5. While playing chords, play the melody on the keyboard. Harmony will be added to your melody notes based on the chords you play. Using Auto Accompaniment Creating Your Own Original Rhythms You can use rhythm editing to modify a built-in Auto Accompaniment rhythm to create an original "user rhythm" of your own. You can select a part (drum, bass, etc.) of a normal, intro, or other pattern (page E-20) and turn it on or off, adjust its volume level, and perform other operations. 1. Select the number of the Auto Accompaniment rhythm you want to edit. 2. At the same time, press the bo (BALLAD/ PIANO RHYTHMS) and bp (USER RHYTHMS) buttons. This displays the rhythm editor screen. 3. Use the accompaniment pattern buttons (2 through 5) to select the pattern (normal, intro, ending, etc.) you want to edit. The button you press will light, indicating that the pattern is being edited. • Each press of 3 (NORMAL/FILL-IN) toggles between NORMAL and FILL-IN, and each press of 4 (VARIATION/FILL-IN) toggles between VARIATION and FILL-IN. The applicable button flashes while the fill-in pattern is selected. Example: When intro is selected 2 3 4 5 E-21
-
 1
1 -
2
-
3
-
4
-
5
-
6
-
7
-
8
-
9
-
10
-
11
-
12
-
13
-
14
-
15
-
16
-
17
-
 18
18 -
 19
19 -
 20
20 -
 21
21 -
 22
22 -
 23
23 -
 24
24 -
 25
25 -
 26
26 -
 27
27 -
 28
28 -
29
-
30
-
31
-
32
-
33
-
34
-
35
-
36
-
37
-
38
-
39
-
40
-
41
-
42
-
43
-
44
-
45
-
46
-
47
-
48
-
49
-
50
-
51
-
52
-
53
-
54
-
55
-
56
-
57
-
58
-
59
-
60
-
61
-
62
-
63
-
64
-
65
-
66
-
67
-
68
-
69
-
70
-
71
-
72
 |
 |
