Casio XJ-460 Owners Manual - Page 34
Image Adjustment, Vertical Position, Horizontal Position, Frequency, Phase, Use
 |
View all Casio XJ-460 manuals
Add to My Manuals
Save this manual to your list of manuals |
Page 34 highlights
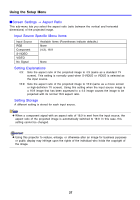
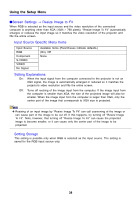
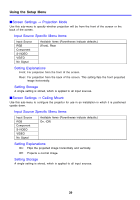
Using the Setup Menu 3. Use the [S] and [T] keys to select the color you want to adjust, and then use the [W] and [X] keys to adjust it. 4. After all the settings are the way you want, press the [MENU] key. IImage Adjustment J Vertical Position This sub-menu lets you adjust the vertical position of the input source image within the projection area. z This setting is not possible when there is no input signal. z "Image Adjustment" main menu item settings are saved for the current signal type only (XGA/60Hz, SXGA/60Hz, etc.), and not for the input signal source. Note, however, that the number of signal type settings that can be saved is limited. Exceeding the limit causes the oldest setting to be deleted automatically. IImage Adjustment J Horizontal Position This sub-menu lets you adjust the horizontal position of the input source image within the projection area. z This setting is not possible when there is no input signal. z See "Image Adjustment J Vertical Position" for details about how settings are saved. IImage Adjustment J Frequency This sub-menu lets you manually control the frequency of the image. Normally, the projector is able to adjust the frequency automatically. If there are vertical bands in the projected image, however, it means that automatic adjustment is not possible for some reason. When this happens use this setting to adjust the image frequency. z This setting is possible only when RGB is selected as the input source. z Settings are saved for each signal type (XGA/60Hz, SXGA/60Hz, etc.). Note, however, that the number of signal type settings that can be saved is limited. Exceeding the limit causes the oldest setting to be deleted automatically. z If, for some reason, your manual frequency settings cause the image input from the computer to disappear from the projection, you can press the [AUTO] key to perform an auto adjust operation (page 8), which should cause the image to reappear. IImage Adjustment J Phase This sub-menu lets you manually control the phase of the image. Normally, the projector is able to adjust the phase automatically. If there are color errors or flickering in the projected image, however, it means that automatic adjustment is not possible for some reason. When this happens use this setting to adjust the image phase. z This setting is possible only when RGB is selected as the input source. z See "Image Adjustment J Frequency" for details about how settings are saved. 34
-
 1
1 -
2
-
3
-
4
-
5
-
6
-
7
-
8
-
9
-
10
-
11
-
12
-
13
-
14
-
15
-
16
-
17
-
18
-
19
-
20
-
21
-
22
-
23
-
24
-
25
-
26
-
27
-
28
-
 29
29 -
 30
30 -
 31
31 -
 32
32 -
 33
33 -
 34
34 -
 35
35 -
 36
36 -
 37
37 -
 38
38 -
 39
39 -
40
-
41
-
42
-
43
-
44
-
45
-
46
-
47
-
48
-
49
-
50
-
51
-
52
-
53
-
54
-
55
-
56
-
57
-
58
-
59
-
60
-
61
-
62
-
63
-
64
-
65
-
66
-
67
-
68
-
69
-
70
-
71
-
72
-
73
-
74
-
75
-
76
-
77
-
78
 |
 |
