Casio XJ-460 Owners Manual - Page 53
Custom Logo Settings, Start Capture
 |
View all Casio XJ-460 manuals
Add to My Manuals
Save this manual to your list of manuals |
Page 53 highlights
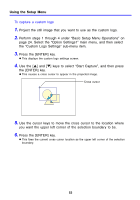
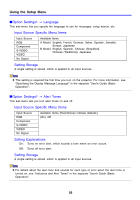
Using the Setup Menu To capture a custom logo 1. Project the still image that you want to use as the custom logo. 2. Perform steps 1 through 4 under "Basic Setup Menu Operations" on page 24. Select the "Option Settings1" main menu, and then select the "Custom Logo Settings" sub-menu item. 3. Press the [ENTER] key. z This displays the custom logo settings screen. 4. Use the [S] and [T] keys to select "Start Capture", and then press the [ENTER] key. z This causes a cross cursor to appear in the projected image. Cross cursor 5. Use the cursor keys to move the cross cursor to the location where you want the upper left corner of the selection boundary to be. 6. Press the [ENTER] key. z This fixes the current cross cursor location as the upper left corner of the selection boundary. 53
-
 1
1 -
2
-
3
-
4
-
5
-
6
-
7
-
8
-
9
-
10
-
11
-
12
-
13
-
14
-
15
-
16
-
17
-
18
-
19
-
20
-
21
-
22
-
23
-
24
-
25
-
26
-
27
-
28
-
29
-
30
-
31
-
32
-
33
-
34
-
35
-
36
-
37
-
38
-
39
-
40
-
41
-
42
-
43
-
44
-
45
-
46
-
47
-
 48
48 -
 49
49 -
 50
50 -
 51
51 -
 52
52 -
 53
53 -
 54
54 -
 55
55 -
 56
56 -
 57
57 -
 58
58 -
59
-
60
-
61
-
62
-
63
-
64
-
65
-
66
-
67
-
68
-
69
-
70
-
71
-
72
-
73
-
74
-
75
-
76
-
77
-
78
 |
 |
