Cisco 891W Hardware Installation Guide - Page 33
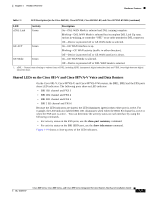
LEDs, lists the LED descriptions for the Cisco 866VAE, Cisco 867VAE, - ios
 |
View all Cisco 891W manuals
Add to My Manuals
Save this manual to your list of manuals |
Page 33 highlights
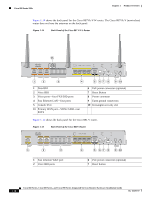
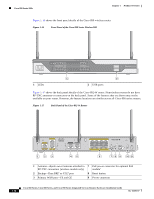
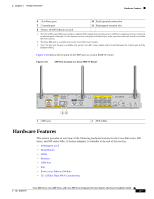
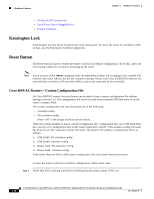
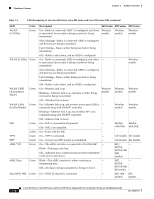
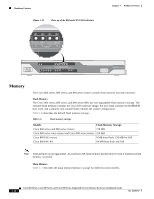
Chapter 1 Product Overview Hardware Features Step 2 Press and hold the reset button until the system status LED begins to flash. Typically, this occurs within five seconds. The router reloads itself after the startup configuration has been replaced with the new customer configuration. LEDs The LEDs are located on the front panel of the router. • Table 1-4 describes the LEDs for the Cisco 860 series, 880 series, and 890 series ISRs. • Table 1-5 lists the LED descriptions for the Cisco 866VAE, Cisco 867VAE, Cisco 866VAE-K9, and Cisco 867VAE-K9 ISRs. Table 1-4 LED Descriptions for the Cisco 860 Series, Cisco 880 Series, and Cisco 890 Series ISRs LED Power OK Color Green Link Status FE0 Link Status FE1 Link Status FE2 Link Status FE3 Link Status FE4 Link Status FE5 Link Status FE6 Link Status FE7 FE WAN Port Link Status Green Green Green GE WAN Port Green Link Status Description On-DC power is being supplied to the router and the Cisco IOS software is running. Blinking-Bootup is in process, or the router is in ROMMON monitor mode. Off-Power is not supplied to the router. On-Ethernet port is connected. Blinking-Data is either being received or being transmitted. Off-Ethernet port is not connected. On-Ethernet port is connected. Blinking-Data is either being received or being transmitted. Off-Ethernet port is not connected. On-Port is connected. Blinking-Data is either being received or being transmitted. Off-Port is not connected. On-Port is connected. Blinking-Data is either being received or being transmitted. Off-Port is not connected. 860 Series 880 Series 890 Series All models All models All models All models All models All models - - All models 861 models 881 models All models - - All models Cisco 860 Series, Cisco 880 Series, and Cisco 890 Series Integrated Services Routers Hardware Installation Guide OL-16193-07 1-19
-
 1
1 -
2
-
3
-
4
-
5
-
6
-
7
-
8
-
9
-
10
-
11
-
12
-
13
-
14
-
15
-
16
-
17
-
18
-
19
-
20
-
21
-
22
-
23
-
24
-
25
-
26
-
27
-
 28
28 -
 29
29 -
 30
30 -
 31
31 -
 32
32 -
 33
33 -
 34
34 -
 35
35 -
 36
36 -
 37
37 -
 38
38 -
39
-
40
-
41
-
42
-
43
-
44
-
45
-
46
-
47
-
48
-
49
-
50
-
51
-
52
-
53
-
54
-
55
-
56
-
57
-
58
-
59
-
60
-
61
-
62
-
63
-
64
-
65
-
66
-
67
-
68
-
69
-
70
-
71
-
72
-
73
-
74
-
75
-
76
-
77
-
78
-
79
-
80
-
81
-
82
-
83
-
84
-
85
-
86
-
87
-
88
-
89
-
90
-
91
-
92
-
93
-
94
-
95
-
96
-
97
-
98
-
99
-
100
-
101
-
102
-
103
-
104
-
105
-
106
-
107
-
108
-
109
-
110
-
111
-
112
 |
 |
