Compaq 100B Maintenance & Service Guide 100B SFF PC - Page 40
Removing the Hard Drive
 |
View all Compaq 100B manuals
Add to My Manuals
Save this manual to your list of manuals |
Page 40 highlights
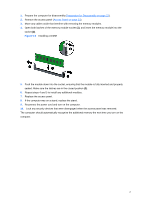
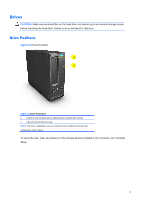
Figure 5-7 Disconnecting the Optical Drive Cables 5. Slide the drive out the front of the unit. Removing the Optical Drive NOTE: To replace the drive, reverse the removal procedure. When installing an optical drive, slide it into the drive bay until it snaps into place. Removing the Hard Drive NOTE: The system does not support Parallel ATA (PATA) hard drives. Before you remove the old hard drive, be sure to back up the data from the old hard drive so that you can transfer the data to the new hard drive. The 3.5-inch hard drive is located under the optical drive. To remove the hard drive: 1. Prepare the computer for disassembly (Preparation for Disassembly on page 22). 2. Remove the access panel (Access Panel on page 23). 3. Remove the front bezel (Front Bezel on page 24). 4. Remove the optical drive (Removing the Optical Drive on page 31). 5. Disconnect the power cable and data cable from the back of the hard drive. 6. Remove two screws securing the drive from cage assembly located on the front of the PC, see figure 6-8 for details. Figure 5-8 Hard drive cage screw location - front 32
-
 1
1 -
2
-
3
-
4
-
5
-
6
-
7
-
8
-
9
-
10
-
11
-
12
-
13
-
14
-
15
-
16
-
17
-
18
-
19
-
20
-
21
-
22
-
23
-
24
-
25
-
26
-
27
-
28
-
29
-
30
-
31
-
32
-
33
-
34
-
 35
35 -
 36
36 -
 37
37 -
 38
38 -
 39
39 -
 40
40 -
 41
41 -
 42
42 -
 43
43 -
 44
44 -
 45
45 -
46
-
47
-
48
-
49
-
50
-
51
-
52
-
53
-
54
-
55
-
56
-
57
-
58
-
59
-
60
-
61
-
62
-
63
-
64
-
65
-
66
-
67
-
68
-
69
-
70
-
71
-
72
-
73
-
74
-
75
-
76
-
77
-
78
-
79
-
80
-
81
-
82
-
83
-
84
-
85
-
86
-
87
-
88
-
89
-
90
-
91
-
92
-
93
-
94
-
95
-
96
-
97
-
98
-
99
-
100
-
101
-
102
-
103
-
104
 |
 |
