Compaq BL20p Installation Guide - Page 83
Clearing the System Configuration
 |
UPC - 720591771058
View all Compaq BL20p manuals
Add to My Manuals
Save this manual to your list of manuals |
Page 83 highlights
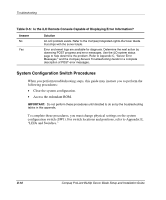
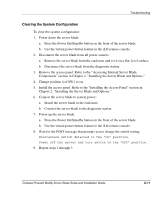
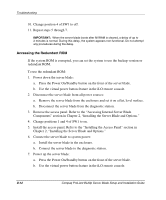
Troubleshooting Clearing the System Configuration To clear the system configuration: 1. Power down the server blade: a. Press the Power On/Standby button on the front of the server blade. b. Use the virtual power button feature in the iLO remote console. 2. Disconnect the server blade from all power sources: a. Remove the server blade from the enclosure and set it on a flat, level surface. b. Disconnect the server blade from the diagnostic station. 3. Remove the access panel. Refer to the "Accessing Internal Server Blade Components" section in Chapter 2, "Installing the Server Blade and Options." 4. Change position 4 of SW1 to on. 5. Install the access panel. Refer to the "Installing the Access Panel" section in Chapter 2, "Installing the Server Blade and Options." 6. Connect the server blade to system power: a. Install the server blade in the enclosure. b. Connect the server blade to the diagnostic station. 7. Power up the server blade: a. Press the Power On/Standby button on the front of the server blade. b. Use the virtual power button feature in the iLO remote console. 8. Wait for the POST message that prompts you to change the switch setting: Maintenance switch detected in the "On" position. Power off the server and turn switch to the "Off" position. 9. Repeat steps 1 through 3. Compaq ProLiant BL20p Server Blade Setup and Installation Guide D-11
-
 1
1 -
2
-
3
-
4
-
5
-
6
-
7
-
8
-
9
-
10
-
11
-
12
-
13
-
14
-
15
-
16
-
17
-
18
-
19
-
20
-
21
-
22
-
23
-
24
-
25
-
26
-
27
-
28
-
29
-
30
-
31
-
32
-
33
-
34
-
35
-
36
-
37
-
38
-
39
-
40
-
41
-
42
-
43
-
44
-
45
-
46
-
47
-
48
-
49
-
50
-
51
-
52
-
53
-
54
-
55
-
56
-
57
-
58
-
59
-
60
-
61
-
62
-
63
-
64
-
65
-
66
-
67
-
68
-
69
-
70
-
71
-
72
-
73
-
74
-
75
-
76
-
77
-
 78
78 -
 79
79 -
 80
80 -
 81
81 -
 82
82 -
 83
83 -
 84
84 -
 85
85 -
 86
86 -
 87
87 -
 88
88 -
89
-
90
-
91
-
92
-
93
-
94
-
95
-
96
-
97
-
98
-
99
-
100
-
101
-
102
-
103
-
104
-
105
-
106
-
107
-
108
 |
 |