Compaq nc8000 HP Compaq nc8000 Business PC, HP Compaq nw8000 Mobile Workstatio - Page 110
Optical Drive
 |
View all Compaq nc8000 manuals
Add to My Manuals
Save this manual to your list of manuals |
Page 110 highlights
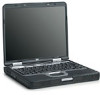
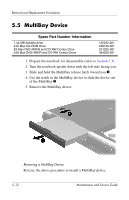
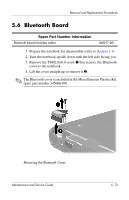
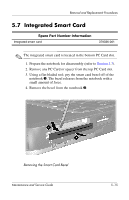
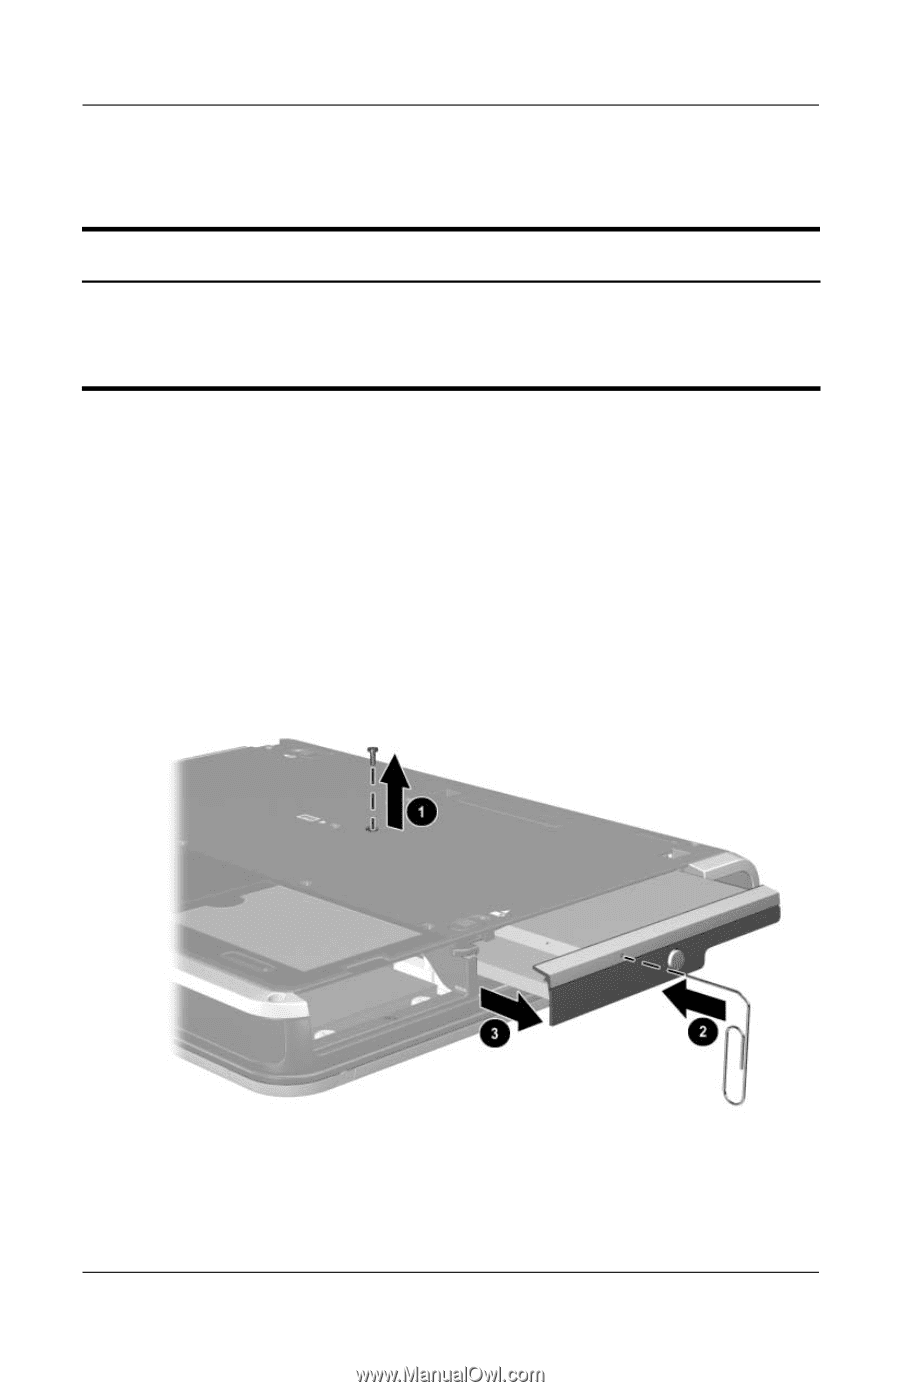
Removal and Replacement Procedures 5.8 Optical Drive Spare Part Number Information 24X Max DVD+RW/R and CD-RW Combo Drive 8X Max DVD-ROM Drive 24X Max DVD/CD-RW Combo Drive 24X Max CD-ROM Drive 349242-001 349241-001 349243-001 349240-001 1. Prepare the notebook for disassembly (refer to Section 5.3). 2. Turn the notebook upside down with the right side facing you. 3. Remove the T8M2.0×6.0 screw 1 that secures the optical drive to the notebook. 4. Insert a paper clip or similar tool into the optical drive release hole to open the optical drive tray 2. 5. Use the optical drive tray to remove the optical drive 3. Removing the Optical Drive Reverse the above procedure to install the optical drive. Maintenance and Service Guide 5-17
-
 1
1 -
2
-
3
-
4
-
5
-
6
-
7
-
8
-
9
-
10
-
11
-
12
-
13
-
14
-
15
-
16
-
17
-
18
-
19
-
20
-
21
-
22
-
23
-
24
-
25
-
26
-
27
-
28
-
29
-
30
-
31
-
32
-
33
-
34
-
35
-
36
-
37
-
38
-
39
-
40
-
41
-
42
-
43
-
44
-
45
-
46
-
47
-
48
-
49
-
50
-
51
-
52
-
53
-
54
-
55
-
56
-
57
-
58
-
59
-
60
-
61
-
62
-
63
-
64
-
65
-
66
-
67
-
68
-
69
-
70
-
71
-
72
-
73
-
74
-
75
-
76
-
77
-
78
-
79
-
80
-
81
-
82
-
83
-
84
-
85
-
86
-
87
-
88
-
89
-
90
-
91
-
92
-
93
-
94
-
95
-
96
-
97
-
98
-
99
-
100
-
101
-
102
-
103
-
104
-
 105
105 -
 106
106 -
 107
107 -
 108
108 -
 109
109 -
 110
110 -
 111
111 -
 112
112 -
 113
113 -
 114
114 -
 115
115 -
116
-
117
-
118
-
119
-
120
-
121
-
122
-
123
-
124
-
125
-
126
-
127
-
128
-
129
-
130
-
131
-
132
-
133
-
134
-
135
-
136
-
137
-
138
-
139
-
140
-
141
-
142
-
143
-
144
-
145
-
146
-
147
-
148
-
149
-
150
-
151
-
152
-
153
-
154
-
155
-
156
-
157
-
158
-
159
-
160
-
161
-
162
-
163
-
164
-
165
-
166
-
167
-
168
-
169
-
170
-
171
-
172
-
173
-
174
-
175
-
176
-
177
-
178
-
179
-
180
-
181
-
182
-
183
-
184
-
185
-
186
-
187
-
188
-
189
 |
 |
Removal and Replacement Procedures
Maintenance and Service Guide
5–17
5.8
Optical Drive
1. Prepare the notebook for disassembly (refer to
Section 5.3
).
2. Turn the notebook upside down with the right side
facing you.
3. Remove the T8M2.0×6.0 screw
1
that secures the optical
drive to the notebook.
4.
Insert a paper clip or similar tool into the optical drive release
hole to open the optical drive tray
2
.
5. Use the optical drive tray to remove the optical drive
3
.
Removing the Optical Drive
Reverse the above procedure to install the optical drive.
Spare Part Number Information
24X Max DVD+RW/R and CD-RW Combo Drive
8X Max DVD-ROM Drive
24X Max DVD/CD-RW Combo Drive
24X Max CD-ROM Drive
349242-001
349241-001
349243-001
349240-001