Craftsman 28933 Operation Manual - Page 123
Idler Bracket
 |
View all Craftsman 28933 manuals
Add to My Manuals
Save this manual to your list of manuals |
Page 123 highlights
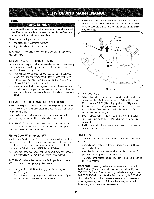
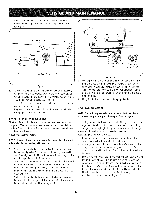
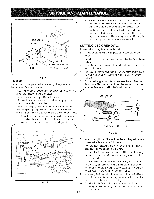
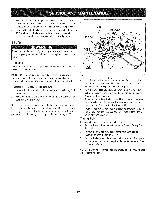
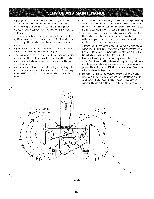
2. Pivotthe idler bracket/idlerpulleyto relievethe tensionon the timingbelt, and repositionthe drivepulleyand/or timingpulleyto achievethe 900orientationof the timingarrowson the pulleys. 3. Re-installthe idler bracketbackstopand positionso that thereis a 1/8"gap betweenthe backstopand idler bracket.Tightenthe hex screwandflange lock nutto securein the adjustedposition. BELTS f FixedIdler Pulley PTOBelt Idler Bracket Be sureto shut the engineoff, removeignitionkey,disconnectthe sparkplug wire(s) to preventunintendedstartingbeforeremovingthe belt(s). PTO Belt All belts on your tractorare subjectto wearand shouldbe replacedif anysigns of wearare present. IMPORTANTD: o not usesubstitutebelts.Thebelt foundon your tractoris speciallydesignedfor optimalperformanceand servicelife for yourdeck application.Use only OEMoriginal replacemenbt elts. Toreplacethe PTObelt,proceedas follows: 1. Removethedeck from beneaththe tractor(referto CuttingDeck Removal). 2. Maneuverthe PTObeltdownwardand off the idler pulleyon the springloadedidler bracket. NOTE:It maybe necessaryto loosenthe hexcap screwand flange lock nut securingthe pulleyto the idler bracketto fit the beltbetween the pulleyand bracket.Slide the beltbetweenthe bottomof the idler pulleyand top of the timing beltidler pulleybelow.See Figure22. ,,, j Figure22 3. Loopthe beltand pushout of theV- grooveof the drivepulleyon the right handspindleassembly.Lift the belt overthe pulleyand out from beneaththe spindlecover.See Figure22. 4. Loopthe newPTObelt and slidebetweenthe topof the drive pulleyand spindlecover.Maneuverthe beltaroundand intothe V-grooveof the drivepulley. 5. Routetheback sideof the beltaroundidler pulleyand between the idler pulleyand idler bracket.Re-tightenthe hexscrewand flangelock nutif loosenedearlier.Referto Figure22. 6. Routethebelt aroundthe fixed idler pulleyas shownin Figure22 and re-installthe deck as describedin "Reinstallingthe Cutting Deck"laterin this section. Timing Belt To replacethe timingbelt, proceedas follows: 1. Removethe deck from beneaththe tractor(referto CuttingDeck Removal). 2. Removethe PTObeltdrive pulleyof the righthand spindle assemblyas describedin "PTOBelt." 3. Removethe hexscrew,flat washer,lock washer,shoulderspacer, and flangelock nut that makeup the idler bracketbackstop.Refer to Figure21 above. NOTE:Itmay be necessaryto cleanthe undersideof the mowingdeck to access thehex screw. 27
-
 1
1 -
2
-
3
-
4
-
5
-
6
-
7
-
8
-
9
-
10
-
11
-
12
-
13
-
14
-
15
-
16
-
17
-
18
-
19
-
20
-
21
-
22
-
23
-
24
-
25
-
26
-
27
-
28
-
29
-
30
-
31
-
32
-
33
-
34
-
35
-
36
-
37
-
38
-
39
-
40
-
41
-
42
-
43
-
44
-
45
-
46
-
47
-
48
-
49
-
50
-
51
-
52
-
53
-
54
-
55
-
56
-
57
-
58
-
59
-
60
-
61
-
62
-
63
-
64
-
65
-
66
-
67
-
68
-
69
-
70
-
71
-
72
-
73
-
74
-
75
-
76
-
77
-
78
-
79
-
80
-
81
-
82
-
83
-
84
-
85
-
86
-
87
-
88
-
89
-
90
-
91
-
92
-
93
-
94
-
95
-
96
-
97
-
98
-
99
-
100
-
101
-
102
-
103
-
104
-
105
-
106
-
107
-
108
-
109
-
110
-
111
-
112
-
113
-
114
-
115
-
116
-
117
-
 118
118 -
 119
119 -
 120
120 -
 121
121 -
 122
122 -
 123
123 -
 124
124 -
 125
125 -
 126
126 -
 127
127 -
 128
128 -
129
-
130
-
131
-
132
-
133
-
134
-
135
-
136
-
137
-
138
-
139
-
140
-
141
-
142
-
143
-
144
-
145
-
146
-
147
-
148
-
149
-
150
-
151
-
152
-
153
-
154
-
155
-
156
-
157
-
158
-
159
-
160
-
161
-
162
-
163
-
164
-
165
-
166
-
167
-
168
-
169
-
170
-
171
-
172
-
173
-
174
-
175
-
176
-
177
-
178
-
179
-
180
-
181
-
182
-
183
-
184
-
185
-
186
-
187
-
188
-
189
-
190
-
191
-
192
 |
 |
