Cub Cadet LTX 1045 Operation Manual - Page 92
Tractor - oil type
 |
View all Cub Cadet LTX 1045 manuals
Add to My Manuals
Save this manual to your list of manuals |
Page 92 highlights
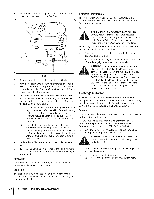
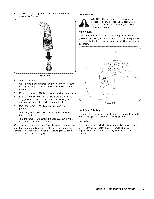
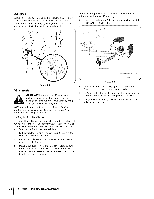
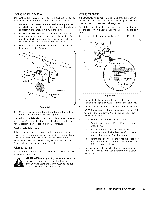
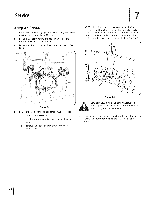
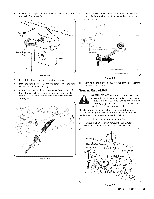
3, Pop open the protective cap on the end of the oil drain valve to expose the drain port. See Fig 6-1. f \ Hydrostatic Transmission The hydrostatic transmission is sealed at the factory and is maintenance-free. The fluid level cannot be checked and the fluid cannot be changed. Battery A CALIFORNIA PROPOSITION 65 WARNING! Battery posts, terminals, and related accessories contain lead and lead compounds, chemicals known to the State of California to cause cancer and reproductive harm. Wash hands after handling. The battery is sealed and is maintenance-free. be checked and fluid cannot be added. Acid levels cannot Always keep the battery cables and terminals clean and free of corrosive build-up. After cleaning the battery and terminals, apply a light coat of petroleum jelly or grease to both terminals. Figure 64 4, Remove the oil fill cap/dipstick from the oil fill tube. 5. Push the oil drain hose (packed with this manual) onto the oil drain port. Route the opposite end of the hose into an appropriate oil collection container with at least a 2.5 quart capacity to collect the used oil. 6, The engine is equipped with either a twist-and-pull drain port or a tabbed drain port. If your engine has the twist- and-pull drain, go to step a. If your engine is equipped with the tabbed drain, go to step b. a. Turn the oil drain valve V4-turn, then pull outward to begin draining oil. After the oil has finished draining, push the end of the oil drain valve back in and turn 1A-turn to secure it back in place. Re-cap the end of the oil drain valve to keep debris from entering the drain port. b. Pinch the tabs on the oil drain valve, then pull outward to begin draining oil. After the oil has finished draining, push the end of the oil drain valve back in, until the tabs click into place. Re-cap the end of the oil drain valve to keep debris from entering the drain port. 7, Replace the oil filter as instructed in the Kohler Owner's Manual. 8. Refill the engine with new oil. Refer to the Kohler Owner's Manual for information regarding the volume and weight of engine oil. Air Cleaner Service the pre-cleaner and cartridge/air cleaner element as instructed in the Kohler Owner's Manual. SparkPlug The spark plug should be cleaned and the gap reset once a season. Refer to the Kohler Owner's Manual for correct plug type and gap specifications. disconnect the NEGATIVE (Black) wire from its CterAmUinaTlIOfNirs:t,If froelmlowoveidng bythethebaPttOerSyITIfVoEr c(Rleeadn)inwg,ire. When reinstalling the battery, always connect the POSITIVE (Red) wire to its terminal first, followed by the NEGATIVE (Black) wire. Be certain that the wires are connected to the correct terminals; reversing them could result in serious damage to your engine's alternating system. (leaning the Tractor Any fuel or oil spilled on the machine should be wiped off promptly. Do NOT allow debris to accumulate around the cooling fins of the engine, the transmission's cooling fan or on any other part of the machine, especially the belts and pulleys. SmartJet Your tractor's deck is equipped with a water port on its surface as part of its deck wash system. Use the Smart Jet to rinse grass clippings from the deck's underside and prevent the buildup of corrosive chemicals. Complete the following steps AFTER EACH MOWING: 1. Drive the tractor to a level, clear spot on your lawn, near enough for your garden hose to reach. chute is directed AWAY from your house, garage, CpaArkUedTIOcaNrs:, Metack. e certain the tractor's discharge 2. Disengage the PTO (Blade Engage), set the parking brake and stop the engine. 3. Thread the hose coupler (packaged with your tractor's Operator's Manual) onto the end of your garden hose. SECTION 6 -- MAINTENANCE & ADJUSTMENTS
-
 1
1 -
2
-
3
-
4
-
5
-
6
-
7
-
8
-
9
-
10
-
11
-
12
-
13
-
14
-
15
-
16
-
17
-
18
-
19
-
20
-
21
-
22
-
23
-
24
-
25
-
26
-
27
-
28
-
29
-
30
-
31
-
32
-
33
-
34
-
35
-
36
-
37
-
38
-
39
-
40
-
41
-
42
-
43
-
44
-
45
-
46
-
47
-
48
-
49
-
50
-
51
-
52
-
53
-
54
-
55
-
56
-
57
-
58
-
59
-
60
-
61
-
62
-
63
-
64
-
65
-
66
-
67
-
68
-
69
-
70
-
71
-
72
-
73
-
74
-
75
-
76
-
77
-
78
-
79
-
80
-
81
-
82
-
83
-
84
-
85
-
86
-
 87
87 -
 88
88 -
 89
89 -
 90
90 -
 91
91 -
 92
92 -
 93
93 -
 94
94 -
 95
95 -
 96
96 -
 97
97 -
98
-
99
-
100
-
101
-
102
-
103
-
104
-
105
-
106
-
107
-
108
-
109
-
110
-
111
-
112
-
113
-
114
-
115
-
116
-
117
-
118
-
119
-
120
-
121
-
122
-
123
-
124
-
125
-
126
-
127
-
128
-
129
-
130
-
131
-
132
-
133
-
134
-
135
-
136
-
137
-
138
-
139
-
140
-
141
-
142
-
143
-
144
 |
 |
