Cuisinart SS-4N1 User Manual - Page 16
Using Steam Wand For, Frothing Milk
 |
View all Cuisinart SS-4N1 manuals
Add to My Manuals
Save this manual to your list of manuals |
Page 16 highlights
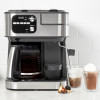
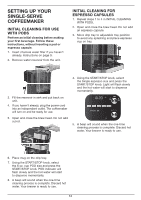
USING STEAM WAND FOR FROTHING MILK Milk frothing is the steaming of milk. The steam does two things: It heats milk and it mixes in air to form a foamy texture. As with anything, perfecting the art of milk texturing takes practice, but the results are well worth it! For best results use cold, refrigerated milk. MILK FROTHING LEVELS Whole Milk purged, stop the steam by pressing the START/STOP knob. The ON indictor will turn off. Low-Fat Milk Fat-Free Milk Non-Dairy Milk 4. Swing the steam wand back to the side of the unit. Place the mug or frothing pitcher under the HOT WATER/STEAM wand. Place the steam want in the milk so that the nozzle is just below the surface of the milk. NOTE: Frothing levels depend on the amount of milk being used. 1. Turn the START/STOP knob clockwise to choose STEAM setting. STEAM indicator will illuminate. 2. Fill a mug or frothing pitcher with milk of your choice. For best results, use a range of 4-8 ounces for your drink recipe to avoid overflow when frothing. TIP: Keep in mind that the volume of milk will increase during the texturing. 3. Purge the steam wand of any water: with the steam wand positioned over the drip tray, activate the steam function by pressing START/STOP knob to start steam process. The ON indictor will illuminate. Once any water has been NOTE: Pitcher not included. 5. Press the START/STOP knob. The STEAM indicator will flash slowly, then begin steaming. The ON indicator will illuminate signifying steam process has started. NOTE: To cancel steaming, simply press the START/STOP knob once again and the steaming process will be stopped. 6. Keeping the pitcher at an angle, insert the steam wand and rest it against the pitcher, keeping the nozzle just below the surface of the milk. 16
-
 1
1 -
2
-
3
-
4
-
5
-
6
-
7
-
8
-
9
-
10
-
 11
11 -
 12
12 -
 13
13 -
 14
14 -
 15
15 -
 16
16 -
 17
17 -
 18
18 -
 19
19 -
 20
20 -
 21
21 -
22
-
23
-
24
-
25
-
26
-
27
-
28
-
29
-
30
-
31
-
32
-
33
-
34
-
35
-
36
-
37
-
38
-
39
-
40
-
41
-
42
-
43
-
44
-
45
-
46
-
47
-
48
-
49
-
50
-
51
-
52
-
53
-
54
-
55
-
56
-
57
-
58
-
59
-
60
-
61
-
62
-
63
-
64
 |
 |
