D-Link DI-724U Product Manual - Page 52
Ethernet LED - driver
 |
UPC - 790069285677
View all D-Link DI-724U manuals
Add to My Manuals
Save this manual to your list of manuals |
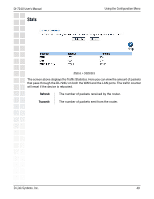
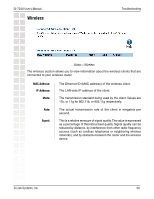
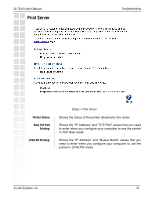
Page 52 highlights
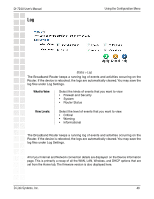
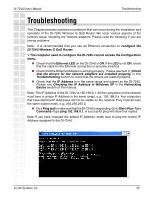
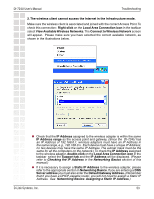
DI-724U User's Manual Troubleshooting Troubleshooting This Chapter provides solutions to problems that can occur during the installation and operation of the DI-724U Wireless G QoS Router. We cover various aspects of the network setup, including the network adapters. Please read the following if you are having problems. Note: It is recommended that you use an Ethernet connection to configure the DI-724U Wireless G QoS Router. 1. The computer used to configure the DI-724U cannot access the Configuration menu. Check that the Ethernet LED on the DI-724U is ON. If the LED is not ON, check that the cable for the Ethernet connection is securely inserted. Check that the Ethernet Adapter is working properly. Please see item 3 (Check that the drivers for the network adapters are installed properly) in this Troubleshooting section to check that the drivers are loaded properly. Check that the IP Address is in the same range and subnet as the DI-724U. Please see Checking the IP Address in Windows XP in the Networking Basics section of this manual. Note: The IP Address of the DI-724U is 192.168.0.1. All the computers on the network must have a unique IP Address in the same range, e.g., 192.168.0.x. Any computers that have identical IP Addresses will not be visible on the network. They must all have the same subnet mask, e.g., 255.255.255.0. Do a Ping test to make sure that the DI-724U is responding. Go to Start>Run>Type Command>Type ping 192.168.0.1. A successful ping will show four replies. Note: If you have changed the default IP Address, make sure to ping the correct IP Address assigned to the DI-724U. D-Link Systems, Inc. 52
-
 1
1 -
2
-
3
-
4
-
5
-
6
-
7
-
8
-
9
-
10
-
11
-
12
-
13
-
14
-
15
-
16
-
17
-
18
-
19
-
20
-
21
-
22
-
23
-
24
-
25
-
26
-
27
-
28
-
29
-
30
-
31
-
32
-
33
-
34
-
35
-
36
-
37
-
38
-
39
-
40
-
41
-
42
-
43
-
44
-
45
-
46
-
 47
47 -
 48
48 -
 49
49 -
 50
50 -
 51
51 -
 52
52 -
 53
53 -
 54
54 -
 55
55 -
 56
56 -
 57
57 -
58
-
59
-
60
-
61
-
62
-
63
-
64
-
65
-
66
-
67
-
68
-
69
-
70
-
71
-
72
-
73
-
74
-
75
-
76
-
77
-
78
-
79
-
80
-
81
-
82
-
83
-
84
-
85
-
86
-
87
-
88
-
89
-
90
-
91
-
92
-
93
-
94
-
95
-
96
-
97
-
98
-
99
-
100
-
101
 |
 |