D-Link DI-724U Product Manual - Page 76
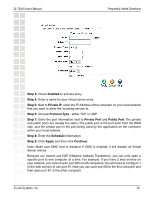
Step 3, Enabled, Step 4, Step 5, Private IP, Step 6, Protocol Type, Step 7, Private Port, Public
 |
UPC - 790069285677
View all D-Link DI-724U manuals
Add to My Manuals
Save this manual to your list of manuals |
Page 76 highlights
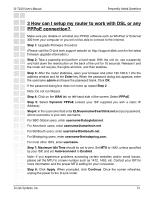
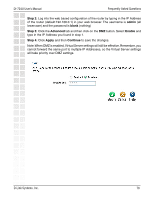
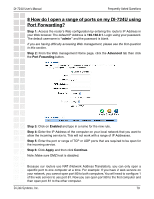
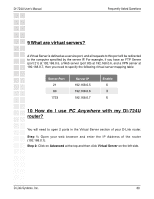
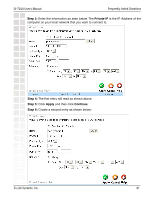
DI-724U User's Manual Frequently Asked Questions Step 3: Check Enabled to activate entry. Step 4: Enter a name for your virtual server entry. Step 5: Next to Private IP, enter the IP Address of the computer on your local network that you want to allow the incoming service to. Step 6: Choose Protocol Type - either TCP or UDP. Step 7: Enter the port information next to Private Port and Public Port. The private and public ports are usually the same. The public port is the port seen from the WAN side, and the private port is the port being used by the application on the computer within your local network. Step 8: Enter the Schedule information. Step 9: Click Apply and then click Continue. Note: Make sure DMZ host is disabled. If DMZ is enabled, it will disable all Virtual Server entries. Because our routers use NAT (Network Address Translation), you can only open a specific port to one computer at a time. For example: If you have 2 web servers on your network, you cannot open port 80 to both computers. You will need to configure 1 of the web servers to use port 81. Now you can open port 80 to the first computer and then open port 81 to the other computer. D-Link Systems, Inc. 76
-
 1
1 -
2
-
3
-
4
-
5
-
6
-
7
-
8
-
9
-
10
-
11
-
12
-
13
-
14
-
15
-
16
-
17
-
18
-
19
-
20
-
21
-
22
-
23
-
24
-
25
-
26
-
27
-
28
-
29
-
30
-
31
-
32
-
33
-
34
-
35
-
36
-
37
-
38
-
39
-
40
-
41
-
42
-
43
-
44
-
45
-
46
-
47
-
48
-
49
-
50
-
51
-
52
-
53
-
54
-
55
-
56
-
57
-
58
-
59
-
60
-
61
-
62
-
63
-
64
-
65
-
66
-
67
-
68
-
69
-
70
-
 71
71 -
 72
72 -
 73
73 -
 74
74 -
 75
75 -
 76
76 -
 77
77 -
 78
78 -
 79
79 -
 80
80 -
 81
81 -
82
-
83
-
84
-
85
-
86
-
87
-
88
-
89
-
90
-
91
-
92
-
93
-
94
-
95
-
96
-
97
-
98
-
99
-
100
-
101
 |
 |
