D-Link DI-724U Product Manual - Page 74
Step 9, Step 10, Status, Connect, Continue
 |
UPC - 790069285677
View all D-Link DI-724U manuals
Add to My Manuals
Save this manual to your list of manuals |
Page 74 highlights
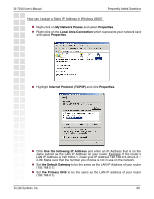
DI-724U User's Manual Frequently Asked Questions Step 9: Turn off your DSL modem for 2-3 minutes. Turn back on. Once the modem has established a link to your ISP, plug the power back into the D-Link router. Wait about 30 seconds and log back into the router. Step 10: Click on the Status tab in the web configuration where you can view the device info. Under WAN, click Connect. Click Continue when prompted. You should now see that the device info will show an IP Address, verifying that the device has connected to a server and has been assigned an IP Address. D-Link Systems, Inc. 74
-
 1
1 -
2
-
3
-
4
-
5
-
6
-
7
-
8
-
9
-
10
-
11
-
12
-
13
-
14
-
15
-
16
-
17
-
18
-
19
-
20
-
21
-
22
-
23
-
24
-
25
-
26
-
27
-
28
-
29
-
30
-
31
-
32
-
33
-
34
-
35
-
36
-
37
-
38
-
39
-
40
-
41
-
42
-
43
-
44
-
45
-
46
-
47
-
48
-
49
-
50
-
51
-
52
-
53
-
54
-
55
-
56
-
57
-
58
-
59
-
60
-
61
-
62
-
63
-
64
-
65
-
66
-
67
-
68
-
 69
69 -
 70
70 -
 71
71 -
 72
72 -
 73
73 -
 74
74 -
 75
75 -
 76
76 -
 77
77 -
 78
78 -
 79
79 -
80
-
81
-
82
-
83
-
84
-
85
-
86
-
87
-
88
-
89
-
90
-
91
-
92
-
93
-
94
-
95
-
96
-
97
-
98
-
99
-
100
-
101
 |
 |

74
DI-724U User’s Manual
D-Link Systems, Inc.
Frequently Asked Questions
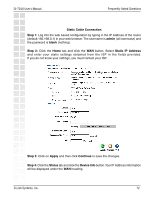
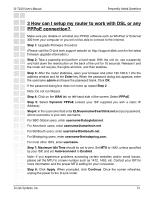
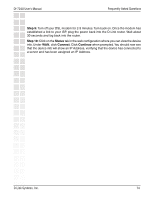
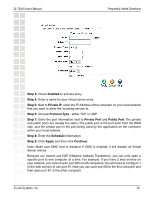
Step 9:
Turn off your DSL modem for 2-3 minutes. Turn back on. Once the modem has
established a link to your ISP, plug the power back into the D-Link router. Wait about
30 seconds and log back into the router.
Step 10:
Click on the
Status
tab in the web configuration where you can view the device
info. Under
WAN
, click
Connect
. Click
Continue
when prompted. You should now see
that the device info will show an IP Address, verifying that the device has connected to
a server and has been assigned an IP Address.