Dell 1130 Laser Mono Printer User's Guide - Page 27
Printing network configuration report, Setting IP address, IP setting using SetIP Program
 |
View all Dell 1130 Laser Mono Printer manuals
Add to My Manuals
Save this manual to your list of manuals |
Page 27 highlights
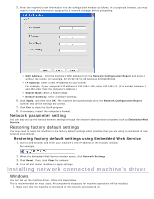
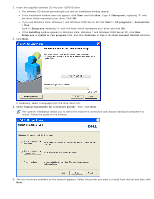
You must set up the network protocols on your machine to use it on your network. This chapter will show you how this is accomplished. You can use network after connecting network cable to a corresponding port on your machine. Printing network configuration report You can print a Network Configuration Report from the machine's control panel that will show the current machine's network settings. This will help you to set up a network and troubleshooting problems. To print the report: In ready mode, press and hold the (cancel button) for about 5 seconds. You can find your machine's MAC address and IP address. For example: MAC Address : 00:15:99:41:A2:78 IP Address : 192.0.0.192 Setting IP address Firstly, you have to set up an IP address for network printing and managements. In most cases a new IP address will be automatically assigned by a DHCP (Dynamic Host Configuration Protocol) server located on the network. In a few situations the IP address must be set manually. This is called a static IP and is often required in corporate Intranets for security reasons. DHCP IP assignment: Connect your machine to the network, and wait a few minutes for the DHCP server to assign an IP address to the machine. Then, print the Network Configuration Report as explained above. If the report shows that the IP address has changed, the assignment was successful. You will see the new IP address in the report. Static IP assignment: Use SetIP program to change the IP address from your computer. In an office environment, we recommend that you contact a network administrator to set this address for you. IP setting using SetIP Program This program is for manually setting the network IP address of your machine using its MAC address to communicate with the machine. A MAC address is the hardware serial number of the network interface and can be found in the Network Configuration Report. For using SetIP program, disable the computer firewall before continuing by performing the following: 1. Open Start > All programs > Control Panel. 2. Double click Security Center. 3. Click Windows Firewall. 4. Disable the firewall. Installing the program 1. Insert the supplied software CD provided with your machine. When the driver CD runs automatically, close that window. 2. Start Windows Explorer and open the X drive. (X represents your CD/DVD drive.) 3. Double-click Application > SetIP. 4. Double-click Setup.exe to install this program. 5. Click OK. If necessary, select a language from the drop-down list. 6. Follow the instructions in the window and complete the installation. Starting the program 1. Connect your machine to the network with a network cable. 2. Turned on the machine. 3. From the Windows Start menu, select All Programs > Dell Printers > SetIP > SetIP. 4. Click on the icon (third from left) in the SetIP window to open the TCP/IP configuration window.
-
 1
1 -
2
-
3
-
4
-
5
-
6
-
7
-
8
-
9
-
10
-
11
-
12
-
13
-
14
-
15
-
16
-
17
-
18
-
19
-
20
-
21
-
 22
22 -
 23
23 -
 24
24 -
 25
25 -
 26
26 -
 27
27 -
 28
28 -
 29
29 -
 30
30 -
 31
31 -
 32
32 -
33
-
34
-
35
-
36
-
37
-
38
-
39
-
40
-
41
-
42
-
43
-
44
-
45
-
46
-
47
-
48
-
49
-
50
-
51
-
52
-
53
-
54
-
55
-
56
-
57
-
58
-
59
-
60
-
61
-
62
-
63
-
64
-
65
-
66
-
67
-
68
-
69
-
70
-
71
-
72
-
73
-
74
-
75
-
76
-
77
-
78
-
79
-
80
-
81
-
82
-
83
-
84
-
85
-
86
-
87
-
88
-
89
-
90
-
91
-
92
-
93
-
94
-
95
-
96
-
97
-
98
-
99
-
100
-
101
-
102
-
103
 |
 |
