Dell 1130 Laser Mono Printer User's Guide - Page 54
Setting your machine as a default machine, Printing to a file PRN
 |
View all Dell 1130 Laser Mono Printer manuals
Add to My Manuals
Save this manual to your list of manuals |
Page 54 highlights
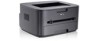
For Windows Server 2008/Vista, select Control Panel > Hardware and Sound > Printers. For Windows 7, select Control Panel > Hardware and Sound > Devices and Printers. For Windows Server 2008 R2, select Control Panel > Hardware > Devices and Printers. 3. Right-click your machine. 4. For Windows XP/Server 2003/Server 2008/Vista, press Printing Preferences. For Windows 7 and Windows Server 2008 R2, from context menus, select the Printing preferences. If Printing preferences item has ► mark, you can select other printer drivers connected with selected printer. 5. Change the settings on each tab. 6. Click OK. If you want to change the settings for each print job, change it in Printing Preferences. Setting your machine as a default machine 1. Click the Windows Start menu. 2. For Windows 2000, select Settings > Printers. For Windows XP/Server 2003, select Printers and Faxes. For Windows Server 2008/Vista, select Control Panel > Hardware and Sound > Printers. For Windows 7, select Control Panel > Hardware and Sound > Devices and Printers. For Windows Server 2008 R2, select Control Panel > Hardware > Devices and Printers. 3. Select your machine. 4. Right-click your machine and select Set as Default Printer. For Windows 7 and Windows Server 2008 R2 If Set as default printer item has ► mark, you can select other printer drivers connected with selected printer. Printing to a file (PRN) You will sometimes need to save the print data as a file. To create a file: 1. Check the Print to file box at the Print window. 2. Click Print.
-
 1
1 -
2
-
3
-
4
-
5
-
6
-
7
-
8
-
9
-
10
-
11
-
12
-
13
-
14
-
15
-
16
-
17
-
18
-
19
-
20
-
21
-
22
-
23
-
24
-
25
-
26
-
27
-
28
-
29
-
30
-
31
-
32
-
33
-
34
-
35
-
36
-
37
-
38
-
39
-
40
-
41
-
42
-
43
-
44
-
45
-
46
-
47
-
48
-
 49
49 -
 50
50 -
 51
51 -
 52
52 -
 53
53 -
 54
54 -
 55
55 -
 56
56 -
 57
57 -
 58
58 -
 59
59 -
60
-
61
-
62
-
63
-
64
-
65
-
66
-
67
-
68
-
69
-
70
-
71
-
72
-
73
-
74
-
75
-
76
-
77
-
78
-
79
-
80
-
81
-
82
-
83
-
84
-
85
-
86
-
87
-
88
-
89
-
90
-
91
-
92
-
93
-
94
-
95
-
96
-
97
-
98
-
99
-
100
-
101
-
102
-
103
 |
 |