Dell 2350 Dell Wireless 2350 Broadband Router User's Guide - Page 111
Static Routing, Select TCP Transmission Control Protocol, or UDP User Datagram Protocol
 |
UPC - 884116055846
View all Dell 2350 manuals
Add to My Manuals
Save this manual to your list of manuals |
Page 111 highlights
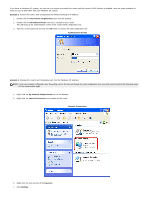
7. In the Port type field, select TCP, UDP, or both protocols. The protocol could be specified in your application's documentation. 8. Click the Submit button to activate the setting. For example, if you want to play the game Fighter Ace II on a computer with an IP address of 192.168.2.3, enter 3 for the Destination IP Address. Select TCP as the Port type. Enter 50000 and 51000 for two fields of Incoming Ports and also for the Destination Port. Click Submit button to activate the setting. For other games or services, consult the application's user manual. Commonly Used Ports Services HTTP (WEB Server) FTP TELNET SMTP (Mail Server) POP3 (Mail Server) IRC NNTP (News Server) Protocol Type TCP TCP TCP TCP TCP TCP TCP Ports 80 20, 21 23 25 110 6667 119 Port Triggering Port triggering allows the router to watch outgoing data for a specific port number. The IP address of the computer that sends the data is remembered by the router, so that when the requested data returns through the router, the data will be passed to the specific computer by way of IP address and port mapping rules. The router opens the port when the Port Triggering happens. When the computer running the application stops sending the data through this port, the router will close the port. 1. Click the PORT TRIGGERING button first. 2. Enter the desired name or description in the Application Name field. 3. In the Trigger Port field, enter a port number. Check with your Internet application provider for more information on what Trigger Port it is using. 4. Select TCP (Transmission Control Protocol), or UDP (User Datagram Protocol), or both protocols as the Trigger Port Type. 5. Specify the range of the Public Ports by typing the start and end port numbers in the required fields. 6. Select TCP (Transmission Control Protocol), or UDP (User Datagram Protocol), or both (TCP and UDP) as the Public Port Type. 7. Click the Submit button to activate the setting. Click the Submit button to store the changes. Back to Top Static Routing Static Routing
-
 1
1 -
2
-
3
-
4
-
5
-
6
-
7
-
8
-
9
-
10
-
11
-
12
-
13
-
14
-
15
-
16
-
17
-
18
-
19
-
20
-
21
-
22
-
23
-
24
-
25
-
26
-
27
-
28
-
29
-
30
-
31
-
32
-
33
-
34
-
35
-
36
-
37
-
38
-
39
-
40
-
41
-
42
-
43
-
44
-
45
-
46
-
47
-
48
-
49
-
50
-
51
-
52
-
53
-
54
-
55
-
56
-
57
-
58
-
59
-
60
-
61
-
62
-
63
-
64
-
65
-
66
-
67
-
68
-
69
-
70
-
71
-
72
-
73
-
74
-
75
-
76
-
77
-
78
-
79
-
80
-
81
-
82
-
83
-
84
-
85
-
86
-
87
-
88
-
89
-
90
-
91
-
92
-
93
-
94
-
95
-
96
-
97
-
98
-
99
-
100
-
101
-
102
-
103
-
104
-
105
-
 106
106 -
 107
107 -
 108
108 -
 109
109 -
 110
110 -
 111
111 -
 112
112 -
 113
113 -
 114
114 -
 115
115 -
 116
116 -
117
-
118
-
119
-
120
-
121
-
122
-
123
-
124
-
125
-
126
-
127
-
128
-
129
-
130
-
131
-
132
-
133
-
134
-
135
-
136
-
137
-
138
-
139
-
140
-
141
-
142
-
143
-
144
-
145
-
146
-
147
-
148
-
149
-
150
-
151
-
152
-
153
-
154
-
155
-
156
-
157
-
158
-
159
-
160
-
161
-
162
-
163
-
164
-
165
-
166
-
167
-
168
-
169
-
170
-
171
-
172
-
173
-
174
-
175
-
176
-
177
-
178
-
179
-
180
-
181
-
182
-
183
-
184
-
185
-
186
-
187
-
188
-
189
-
190
-
191
-
192
-
193
-
194
-
195
-
196
-
197
-
198
-
199
-
200
-
201
-
202
-
203
-
204
-
205
-
206
-
207
-
208
-
209
-
210
-
211
 |
 |
