Dell 3200MP Content: Dell 3200MP Projector User's Guide - Page 30
Computer Image, Management, Changing the Lamp, Back to Contents - lamp replacement
 |
View all Dell 3200MP manuals
Add to My Manuals
Save this manual to your list of manuals |
Page 30 highlights
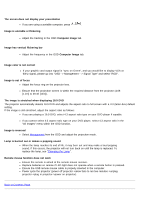
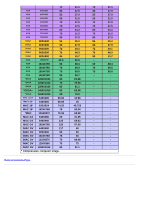
The screen does not display your presentation If you are using a portable computer, press . Image is unstable or flickering Adjust the tracking in the OSD Computer Image tab. Image has vertical flickering bar Adjust the frequency in the OSD Computer Image tab. Image color is not correct If your graphic card output signal is "sync on Green", and you would like to display VGA at 60Hz signal, please go into "OSD--> Management --> Signal Type" and select "RGB". Image is out of focus Adjust the focus ring on the projector lens. Ensure that the projection screen is within the required distance from the projector (4.0ft [1.2m] to 39.4ft [12m]). The image is stretched when displaying 16:9 DVD The projector automatically detects 16:9 DVD and adjusts the aspect ratio to full screen with a 4:3 (letter-box) default setting. If the image is still stretched, adjust the aspect ratio as follows: If you are playing a 16:9 DVD, select 4:3 aspect ratio type on your DVD player if capable. If you cannot select 4:3 aspect ratio type on your DVD player, select 4:3 aspect ratio in the "All Images" menu within the OSD function. Image is reversed Select Management from the OSD and adjust the projection mode. Lamp is burned out or makes a popping sound When the lamp reaches its end of life, it may burn out and may make a loud popping sound. If this occurs, the projector will not turn back on until the lamp is replaced. To replace the lamp, see "Changing the Lamp". Remote mouse function does not work Ensure the remote is aimed at the remote mouse receiver. Replace batteries on remote if LED light does not operate when a remote button is pressed. Ensure the USB remote mouse cable is properly inserted in the computer. Power cycle the projector (power off projector->allow fans to run two minutes->unplug projector->plug in projector->power on projector). Back to Contents Page
-
 1
1 -
2
-
3
-
4
-
5
-
6
-
7
-
8
-
9
-
10
-
11
-
12
-
13
-
14
-
15
-
16
-
17
-
18
-
19
-
20
-
21
-
22
-
23
-
24
-
 25
25 -
 26
26 -
 27
27 -
 28
28 -
 29
29 -
 30
30 -
 31
31 -
 32
32 -
 33
33 -
 34
34 -
 35
35 -
36
-
37
-
38
-
39
-
40
-
41
-
42
-
43
-
44
-
45
-
46
-
47
-
48
-
49
-
50
-
51
-
52
-
53
-
54
-
55
-
56
 |
 |
