Dell 962 All In One Photo Printer Dell™ Photo Printer 540 User's Gui - Page 10
Changing Settings-Press Menu, Select Menu Items, Print Options Menu
 |
View all Dell 962 All In One Photo Printer manuals
Add to My Manuals
Save this manual to your list of manuals |
Page 10 highlights
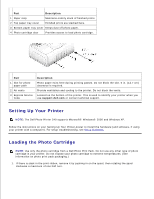
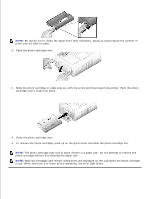
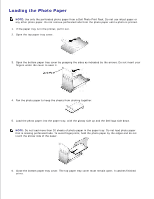
6. 7. Open the paper tray door. 8. With the top paper tray cover open, insert the paper tray into the printer. Changing Settings-Press Menu Press the Menu button to customize your photo and printer settings. Select Menu Items 1. Press the Menu button. 2. Press until the menu heading you want appears on the display, then press Select ( ). 3. Continue scrolling until the option you want is highlighted. 4. Press Select ( ) and follow the directions on the LCD. NOTE: The option currently selected is noted with a checkmark. Print Options Menu
-
 1
1 -
2
-
3
-
4
-
 5
5 -
 6
6 -
 7
7 -
 8
8 -
 9
9 -
 10
10 -
 11
11 -
 12
12 -
 13
13 -
 14
14 -
 15
15 -
16
-
17
-
18
-
19
-
20
-
21
-
22
-
23
-
24
-
25
-
26
-
27
-
28
-
29
-
30
-
31
-
32
-
33
-
34
-
35
-
36
-
37
-
38
-
39
-
40
-
41
-
42
 |
 |

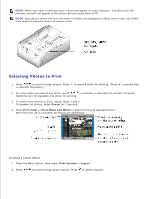
Open the paper tray door.
7.
With the top paper tray cover open, insert the paper tray into the printer.
8.
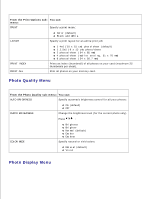
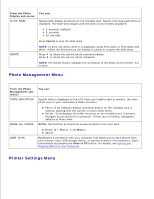
Changing Settings-Press Menu
Press the
Menu
button to customize your photo and printer settings.
Select Menu Items
Press the
Menu
button.
1.
Press
until the menu heading you want appears on the display, then press
Select
(
).
2.
Continue scrolling
until the option you want is highlighted.
3.
Press
Select
(
) and follow the directions on the LCD.
4.
NOTE:
The option currently selected is noted with a checkmark.
Print Options Menu