Dell 962 All In One Photo Printer Dell™ Photo Printer 540 User's Gui - Page 12
Photo Management Menu, Printer Settings Menu, From the Photo, Display sub-menu, You can, Cancel
 |
View all Dell 962 All In One Photo Printer manuals
Add to My Manuals
Save this manual to your list of manuals |
Page 12 highlights
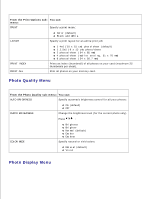
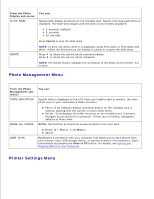
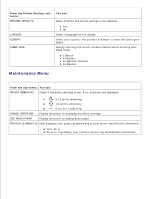
From the Photo Display sub-menu: SLIDE SHOW You can: Sequentially display all photos on the installed card. Specify how long each photo is displayed. The slide show begins with the photo most recently displayed 3 seconds (default) 5 seconds 10 seconds Press Cancel to stop the slide show. ROTATE NOTE: To print any photo while it is displayed, press Print Color or Print Black and White. Follow the directions on the display to cancel or resume the slide show. Press to rotate the current photo counterclockwise. Press to rotate the current photo clockwise. NOTE: The Rotate feature changes the orientation of the photo on the screen, not in print. Photo Management Menu From the Photo Management submenu: PHOTO NAVIGATION You can: Specify what is displayed on the LCD when you install a card or camera: the main photo view or your card/camera folder structure. ERASE ALL PHOTOS Photo View (default)-display individual photos on the installed card or camera, starting with the current or most recent photo. Folder View-displays the folder structure on the installed card, if present. Navigate as you would on a computer. If there are no folders, navigation defaults to Photo View. NOTE: This function permanently erases all photos from your card. Erase All Photos from Memory Cancel SAVE TO PC Establishes a connection with your computer that allows you to save photos from your memory card, USB storage device, or camera directly to the computer. Same functionality as pressing the Save to PC button. For details, see Saving and Copying Photos to Your Computer. Printer Settings Menu
-
 1
1 -
2
-
3
-
4
-
5
-
6
-
 7
7 -
 8
8 -
 9
9 -
 10
10 -
 11
11 -
 12
12 -
 13
13 -
 14
14 -
 15
15 -
 16
16 -
 17
17 -
18
-
19
-
20
-
21
-
22
-
23
-
24
-
25
-
26
-
27
-
28
-
29
-
30
-
31
-
32
-
33
-
34
-
35
-
36
-
37
-
38
-
39
-
40
-
41
-
42
 |
 |