Dell Alienware x16 R2 Owners Manual - Page 75
Slide the display-cable holder so that the triangle mark on the display cable aligns with the triangle mark on the display-cable
 |
View all Dell Alienware x16 R2 manuals
Add to My Manuals
Save this manual to your list of manuals |
Page 75 highlights
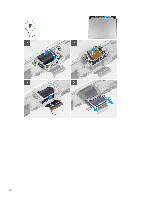
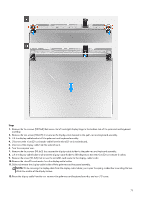
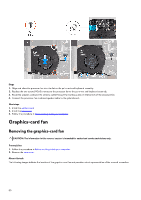
NOTE: Place the computer on a soft and clean surface to avoid scratching the display. Steps 1. Align the screw holes on the display assembly with the screw holes on the palm-rest and keyboard assembly. 2. Gently slide the display cable through the plastic strip between the palm-rest and keyboard assembly and rear-I/O cover. 3. Route the display cable through the slit on the other side of the rear-I/O cover. NOTE: The display cable must be routed under the rear-I/O cover in order to properly install the display assembly. Failing to do so damages the display cable. 4. Replace the four screws (M2.5x4) that secure the left and right display hinge to the top side of the palm-rest and keyboard assembly. NOTE: If the display is not fully closed, you cannot install the display-cable holder correctly. 5. Slide the display-cable holder so that the triangle mark on the display cable aligns with the triangle mark on the display-cable holder. 6. From the bottom of the display-cable holder, route the display cable into the opening that is next to the triangle mark. 7. Slide the display cable over the bar on the display-cable holder and into the opening on the other side of the holder. 8. Slide the display-cable holder towards the display assembly until the display-cable holder is aligned against the rear-I/O cover. 9. Align the screw hole on the microSD card-reader along with the screw hole on the display-cable holder. 75
-
 1
1 -
2
-
3
-
4
-
5
-
6
-
7
-
8
-
9
-
10
-
11
-
12
-
13
-
14
-
15
-
16
-
17
-
18
-
19
-
20
-
21
-
22
-
23
-
24
-
25
-
26
-
27
-
28
-
29
-
30
-
31
-
32
-
33
-
34
-
35
-
36
-
37
-
38
-
39
-
40
-
41
-
42
-
43
-
44
-
45
-
46
-
47
-
48
-
49
-
50
-
51
-
52
-
53
-
54
-
55
-
56
-
57
-
58
-
59
-
60
-
61
-
62
-
63
-
64
-
65
-
66
-
67
-
68
-
69
-
 70
70 -
 71
71 -
 72
72 -
 73
73 -
 74
74 -
 75
75 -
 76
76 -
 77
77 -
 78
78 -
 79
79 -
 80
80 -
81
-
82
-
83
-
84
-
85
-
86
-
87
-
88
-
89
-
90
-
91
-
92
-
93
-
94
-
95
-
96
-
97
-
98
-
99
-
100
-
101
-
102
-
103
-
104
-
105
-
106
-
107
-
108
-
109
-
110
-
111
-
112
-
113
-
114
-
115
-
116
-
117
-
118
-
119
-
120
-
121
-
122
-
123
-
124
-
125
-
126
-
127
-
128
-
129
-
130
-
131
-
132
-
133
 |
 |
