Dell E5515H Dell User Guide - Page 17
Identifying Parts and Controls, Front View, Back View, Back View with monitor stand - e5515hc
 |
View all Dell E5515H manuals
Add to My Manuals
Save this manual to your list of manuals |
Page 17 highlights
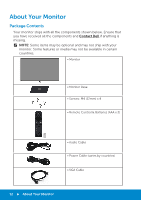
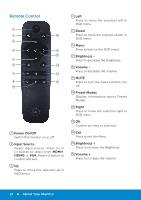
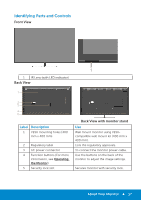
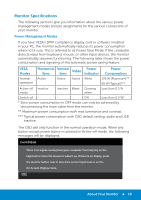
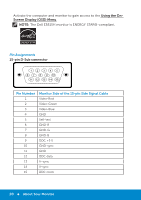
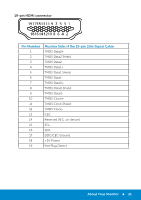
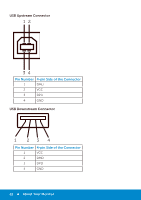
Identifying Parts and Controls Front View 1 1 IR Lens (with LED indicator) Back View 1 2 3 4 5 DELL Flat Panel Monitor /Moniteur écran plat Model No. : E5515Hc : 100-240V 50/60Hz 2.5A S/N: CN-0 P2NYV-64180-46D-001T REV A00 Service Tag:1NGTQV1 Express SVC code:359 576 607 7 Manufactured Date: Jul. 2014 CAN ICES-3 (B)/NMB-3(B) The equipment must be connected to an earthed mains socket-outlet. L'appareil doit être branché sur une prise de courant munie d'une mise à la terre. Raheen Business Park Limerick Ireland www.dell.com Made in China Label Description 1 VESA mounting holes (400 mm x 400 mm) 2 Regulatory label 3 AC power connector 4 Function buttons (For more information, see Operating the Monitor) 5 Security lock slot DELL Flat Panel Monitor /Moniteur écran plat Model No. : E5515Hc : 100-240V 50/60Hz 2.5A S/N: CN-0 P2NYV-64180-46D-001T REV A00 Service Tag:1NGTQV1 Express SVC code:359 576 607 7 Manufactured Date: Jul. 2014 CAN ICES-3 (B)/NMB-3(B) The equipment must be connected to an earthed mains socket-outlet. L'appareil doit être branché sur une prise de courant munie d'une mise à la terre. Raheen Business Park Limerick Ireland www.dell.com Made in China Back View with monitor stand Use Wall mount monitor using VESAcompatible wall mount kit (400 mm x 400 mm). Lists the regulatory approvals. To connect the monitor power cable. Use the buttons on the back of the monitor to adjust the image settings. Secures monitor with security lock. About Your Monitor 17
-
 1
1 -
2
-
3
-
4
-
5
-
6
-
7
-
8
-
9
-
10
-
11
-
 12
12 -
 13
13 -
 14
14 -
 15
15 -
 16
16 -
 17
17 -
 18
18 -
 19
19 -
 20
20 -
 21
21 -
 22
22 -
23
-
24
-
25
-
26
-
27
-
28
-
29
-
30
-
31
-
32
-
33
-
34
-
35
-
36
-
37
-
38
-
39
-
40
-
41
-
42
-
43
-
44
-
45
-
46
-
47
-
48
-
49
-
50
-
51
-
52
-
53
-
54
-
55
-
56
-
57
-
58
-
59
-
60
-
61
-
62
-
63
-
64
-
65
-
66
-
67
-
68
-
69
 |
 |
