Dell E5515H Dell User Guide - Page 32
Removing the Monitor Stand, Wall Mounting (Optional) - dimensions
 |
View all Dell E5515H manuals
Add to My Manuals
Save this manual to your list of manuals |
Page 32 highlights
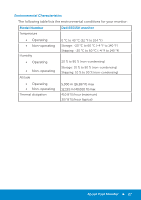
ModFlelat:NPo1a.0Dn:0Ee-lEL2L545M01oV5niHtco5r0//6M0oHnizte2.ur5Aécran plat MRaadàhelieL'aenatTnCpehhBrCpieruAanesrei.aNeqnIileuCisEdspSo-iPmt3aer(ênktBtr)L/iemNmbureMsrtaiB-cnbk3c(eIhrBc)éelosanunnrdeuctnweewdptwr.iodseaelln.dceeoacrmtohureMEadaxntnmprauimfenuassncistseRouSdErc'VkuVeeCndt-Aeco0Dum0italtseeete:.:3J5uSl9/.5NS2:7e06rC1vi64N-c0e07 TP7a2NgY:1VN-G6T41Q8V01-46D-001T Removing the Monitor Stand NOTE: To prevent scratches on the LCD screen while removing the stand, ensure that the monitor is placed on a soft, clean surface. To remove the stand: 1. Place the monitor on a flat surface. 2. Release the screw located on the back cover. 3. Remove the stand from the monitor. Wall Mounting (Optional) (Screw dimension: M6 x 30 mm).* *Depending on your mounting solution, you may need longer than 30mm screw. 32 Setting Up the Monitor
-
 1
1 -
2
-
3
-
4
-
5
-
6
-
7
-
8
-
9
-
10
-
11
-
12
-
13
-
14
-
15
-
16
-
17
-
18
-
19
-
20
-
21
-
22
-
23
-
24
-
25
-
26
-
 27
27 -
 28
28 -
 29
29 -
 30
30 -
 31
31 -
 32
32 -
 33
33 -
 34
34 -
 35
35 -
 36
36 -
 37
37 -
38
-
39
-
40
-
41
-
42
-
43
-
44
-
45
-
46
-
47
-
48
-
49
-
50
-
51
-
52
-
53
-
54
-
55
-
56
-
57
-
58
-
59
-
60
-
61
-
62
-
63
-
64
-
65
-
66
-
67
-
68
-
69
 |
 |
